The next example is migrating
your information from an older computer, which could be an old Windows
2000 system, a Windows XP system, or a newer Windows Vista system, to a
new, separate Windows 7 system. In this case, it’s actually a simpler
procedure because you can make sure that the new Windows 7 system is
running and configured before you copy your data off the old system.
This allows you to run the migration with both systems side by side, and
it also gives you the option of going back if you aren’t happy with a
choice during your migration. You also have the option of performing a
live migration, directly from one system to the other.
For this example, we use PC Mover software to demonstrate the process.
Caution
You
should be aware of an important caveat with regard to the PC Mover
software: it is licensed on a per-migration basis. This means that you
must pay for each migration you perform.
This is important because it means that if you buy the Home edition of
the PC Mover software, it is licensed for a single migration only—if you
run into any issues during the migration that require you to remigrate
your system, you will have already used the license and will need to buy
another one. Similarly, if you are using the Integrator or Enterprise
editions, which come with prelicensed bundles of migrations (20 for
Integrator, 20, 100, or 500 for Enterprise), you will pay for each
migration attempt.
Because your PC Mover
license covers only one migration (unless you have purchased bundles of
migrations for an office setting), this means in practice that you need
to preplan your migration, including reading the PC Mover documentation
ahead of time and making sure that no issues exist before
you actually perform the migration. You will not have the option of
performing a test migration to troubleshoot any issues, without paying
for that test. So plan ahead.
In migrating to a new
computer, one thing we have found performing direct migration very
handy. In the previous section, we discussed using a file-based
migration in which your migrated settings and data from your old system
installation are stored in a data file and then loaded into the new
system. You can use that same approach when moving data from one
computer to another, as well, but it is not the approach we recommend.
Instead, we recommend that
you create a physical connection between the two computers. Rather than
storing the migrated applications, settings, and data files, the
connection is used to directly transfer the information to the new
computer, where it is immediately installed appropriately.
To perform a direct migration, you need one of the following:
A USB direct-connect
cable. When you purchase the PC Mover software, you can buy a bundled
cable for use with the software. Alternatively, you can buy one
separately. Note that you need to use the correct type of USB
cable—either USB 1.1 or USB 2.0. Although your Windows 7 computer is
almost certain to be USB 2.0 capable, if your older computer has a
Pentium II-grade CPU, it is probably only USB 1.1 compatible, and you
will need to use the USB 1.1 cable. If you are uncertain, be aware that
the USB 2.0 cable can be used on a USB 1.1 system, albeit at lower
speeds.
A
network connection between the two computers. If you have a network
hub/switch (note that these are commonly included in many modern cable
modems and DSL routers if you have a broadband connection), or are using
a wireless connection, you can directly connect the two computers
across the network.
Our preference if at all possible is to use the network connection rather than the USB cable. There are two reasons for this:
If
your old computer uses a high-speed Internet connection, you will
presumably be using that same high-speed Internet connection with the
new system. Why not take advantage of that connection to perform your
migration?
Frankly,
it’s faster. Significantly faster. To illustrate, we once performed the
same migration using a USB cable and a Fast Ethernet network
connection. The migration performed using the USB cable took 14 times as
long to perform—16 hours versus 1 hour and 15 minutes over the network.
You also have the option,
of course, of migrating using the file method we discussed in the
previous section. If that is the case, use that same procedure. When you
reach Task 3, however, you should be working on your new computer
rather than installing Windows 7 on your old system.
Broadly speaking, when moving apps and data from one computer to another, you will have five tasks to perform:
Perform premigration setup if you are going to use a network connection.
Install the migration software on both computers.
Create a connection between the computers (either USB cable or over the network)
Use the migration software to perform the migration.
Clean up.
Note
As far as we can tell, PC
Mover does not support migration of security software. Therefore, this
is the one type of software that you must manually install, preferably
before you install your other migrated software.
Task 1: Premigration Setup for Network Connect
If you plan to use a network connection to perform your migration, you need to do a small amount of setup first.
1. | If
you use some form of high-speed Internet connection, make sure that
both computers can access the Internet simultaneously. This should
involve nothing more than connecting your new computer to the same
Internet hub that your old computer is using. If, however, you are using
a dial-up connection and you have a local network, you will need to
separately attach your computer to your network and configure it, in the
same manner that your older computer was connected and configured.
|
2. | Determine
the old computer’s IP address by selecting the Start menu and selecting
All Programs, Accessories, Command prompt. This launches a command
prompt window.
|
3. | In the command window, type ipconfig/all and press Enter. See Figure 1.

|
4. | Write down the number listed next to IP Address. In this case, the number is 192.168.1.113.
|
5. | Scroll up a bit until you can see the Host Name entry. Write down the name listed. In this case, the name is remington.
|
6. | Leave the command prompt window open for the time being.
|
7. | Determine
the new computer’s IP address, using the same procedure as for finding
the old computer’s IP. Again, leave the command prompt window open. For
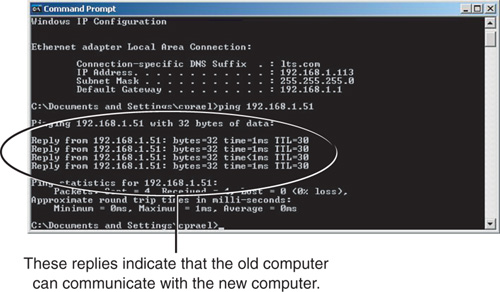
this example, our new computer has the IP address 192.168.1.51 and the
name Goddess. Write this information down, being sure to note that it is
for the new computer.
|
8. | Verify that the old computer can see the new computer on the network. In the command prompt window on the old computer, type ping xxx.xxx.xxx.xxx, where xxx.xxx.xxx.xxx is the IP address of the new computer. You should see a set of messages stating that a reply occurred (as shown in Figure 2).
|
9. | Verify
that the new computer can also see the old computer, using the same
procedure as for determining that the old computer can see the new
computer.
|
10. | Close the command prompt windows on both computers.
|
If the two computers
can’t see each other, you need to diagnose and resolve why that would be
the case. One problem that we have seen on occasion is two computers
having the same IP address, which would cause an immediate failure.
Beyond that, you probably want to call your local computer/networking
expert for help resolving the problem, if you don’t know how to resolve
the problem yourself. Alternatively, a quick search on Google turns up a
number of network troubleshooting pages that describe basic steps you
can follow to fix your problem.