1. Using Public Folders
Windows 7 (and Windows Vista)
includes a Public folder from which files are shared automatically. This
feature is similar to the Shared Documents folder in Windows XP. You
can simply move any files that you intend to share across all user
accounts or computers in a private network to that folder. To get to
that folder:
Open any folder (for example, click the Start button and choose Computer or your user name).
Expand a library in the left pane until you see the library's Public folder, as in Figure 1.
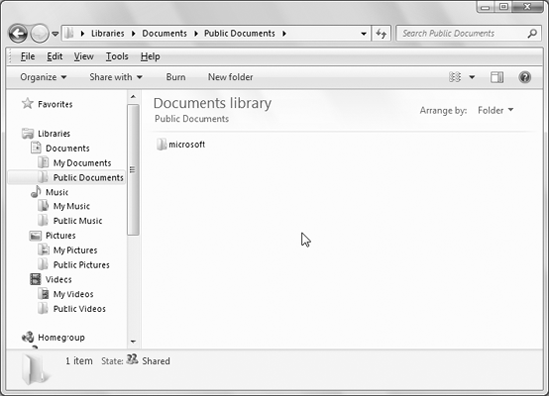
The Public folders you see in
the Navigation pane are actually all contained in a single folder named
Public in the Users folder. (The default path is C:\Users\Public.) The
Public folder is organized much like your Documents folders. It contains
subfolders for storing Documents, Downloads, Music, Pictures, and
Videos. If you have the Premium or Ultimate Edition of Windows 7, it
also contains a Recorded TV folder, in which Media Center–recorded TV
files are stored.
|
Clicking the leftmost button in the address bar of any folder also provides a quick link to the Public folder.
|
|
Perhaps the easiest way to
move files into a Public folder would be to open one of its subfolders,
like Public Documents or Public Pictures. Then open the folder that
contains the files you want to share. Size and position the two windows
so you can see both. Then drag files from one folder to the other.
The
Public folder is shared in a way where every user on the computer (and
in the network) has free reign over its contents. In other words, every
user has equal rights to the Public folder.
2. Advanced Sharing
Advanced Sharing
allows a user with administrative privileges to set custom permissions
for multiple users, control the number of simultaneous connections and
caching for offline files, and set other advanced properties. Some of
these topics require training in or knowledge of network administration.
The Public folder and selective sharing methods described in the
preceding sections should be adequate for a home network, and much
easier to work with.
For people who
understand the concepts (and potential problems) involved, I'll just
quickly run through the process. Locate the folder you want to share,
right-click that folder's icon, and choose Properties. Click the Sharing
tab and click Advanced Sharing. Elevate your privileges (if prompted)
and choose Share This Folder. Then click the Apply button. Set the
number of simultaneous users up to a maximum of 20 and (optionally) add a
comment.
To configure sharing
permissions, click the Permissions button to open the Permissions dialog
box for the shared folder. Here you can view existing sharing
permissions and also add and remove users and groups. You'll notice that
you are limited to specifying Full Control, Change, or Read permission
sharing levels.
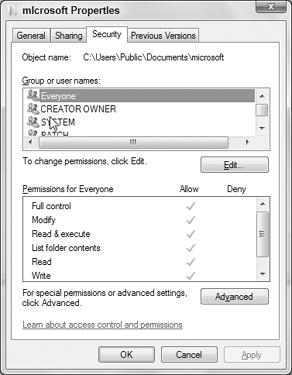
If the disk where the shared
folder resides is on an NTFS volume, you can also set NTFS permissions,
which are more flexible than sharing permissions. To set NTFS
permissions, open the properties for the folder and click the Security
tab (Figure 2).
On the Security tab you can add
or remove users and groups and specify the permission levels for each
one. The available permissions are more granular than the sharing
permissions described previously, giving you finer control over what
each user or group can do in the folder. As you assign permissions, keep
in mind that the most restrictive permissions apply. For example, if
you share a folder and apply Full Control for all users, but then set
NTFS permissions so that all users have only Read access, then the more
restrictive NTFS permissions will apply and users will only be able to
read items in the folder, not modify them.
3. Identifying Shared Folders
In Windows 7 you have a few
methods for identifying which folders are shared. First, in Windows
Explorer, click a folder. If the folder is shared, you'll see the words
"State: Shared" in the status bar at the bottom of the window.
You can also use the Shared
Folders snap-in with the Computer Management console to see which
folders are shared. To open Shared Folders, click Start, right-click
Computer, and choose Manage. When the Computer Management console opens,
expand the Shared Folders branch and click Shares. The folders that are
shared, whether visible or hidden, appear in the right pane.
You can also use the NET command in a command console to see what is shared. Open a command console and type the command NET SHARE to see a listing of shared resources.
4. Sharing a Printer
Printers in a local area
network will usually be connected to one of the computers in that
network. To ensure that the printer is shared, so everybody in the
network can use it, follow these steps:
|
With the right hardware, you
can connect a printer directly to a LAN without going through a
computer. With that type of arrangement, you need only to make sure that
the printer is turned on and connected to the network, and configured
with network settings appropriate for your network.
|
|
Go
to the computer to which the printer is connected by cable. If either
is turned off, turn on the printer first and the computer second.
Click Start => Devices and Printers.
Double-click the icon of the printer that you want to share.
Double-click Customize Your Printer to open the Properties dialog box for the printer.
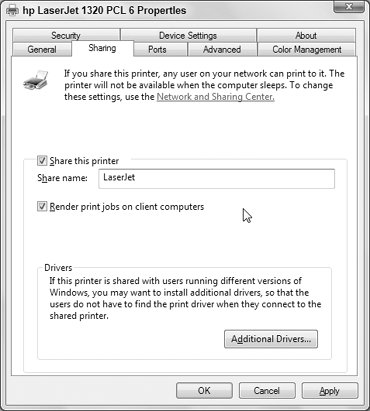
Click
the Sharing tab, then select Share This Printer, type a name in the
Share Name text box, and choose to render print jobs on the client as in
Figure 3.
NOTE
The Render Print
Jobs on Client Computers option lets each user control print jobs from
his or her own computer. In earlier versions of Windows, most print jobs
had to be managed from the printer to which the computer was physically
attached.
When you click the
printer's icon in Devices and Printers, the status bar will indicate
that the printer is shared. The printer should show up automatically in
all network computers' Print dialog boxes
Though you can share folders
and documents freely on a LAN, there's no way to share programs. You can
only run programs currently installed on your computer and accessible
from your All Programs menu. If you try to open a document on another
computer, but don't have the appropriate program for that document type,
you can't open the document.
Don't bother trying to
copy an installed program from one computer to another — except in rare
cases it won't work. Only programs that you specifically install on your
own computer will run on your computer.
The
only solution will be to install the necessary program on your own
computer. If the program you need is free, like Adobe Acrobat Reader,
you can download and install the program in the usual manner.