Homegroups are a new feature
in Windows 7 that simplify setting up a home network and sharing
resources on the network. When you set up a Windows 7 computer, Windows
creates a homegroup automatically if one doesn't already exist, and
generates a network password for the homegroup. With that network
password, other Windows 7 computers on the network can join the
homegroup, and users on those computers can access resources that are
shared by other computers in the homegroup.
|
Computers must be
running Windows 7 to participate in a homegroup, and support for
homegroups is included in all editions of Windows 7. However, Windows 7
Starter and Windows 7 Home Basic can participate in a homegroup but
cannot create one.
|
|
1. Finding or changing the homegroup password
If Windows 7 doesn't find
an existing homegroup, it creates one. From that point on, you can add
other Windows 7 computers to that existing homegroup. All you need is
the homegroup password, which Windows 7 creates automatically when it
creates the homegroup.
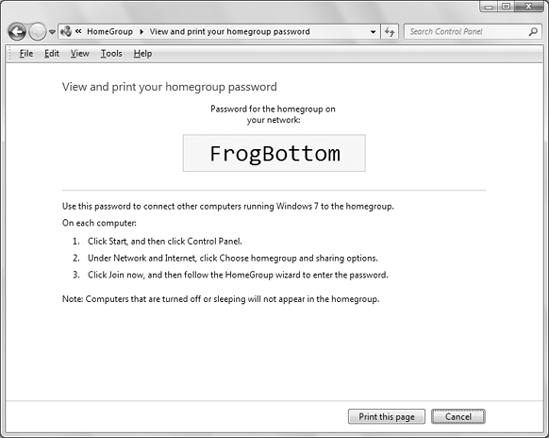
If you don't already know
the homegroup password, open the Control Panel and under Network and
Internet, click Choose Homegroup and Sharing Options. In the Homegroup
applet, click View or Print the Homegroup Password. A dialog box opens (Figure 1) and displays the password. Click Print This Page if you need a printed copy.
As mentioned previously,
Windows 7 sets the homegroup password when it sets up the homegroup. If
needed, you can change the password. To do so, first make sure all of
the computers in the homegroup are turned on. Then, open the Homegroup
applet as explained previously and click Change the Password. In the
resulting dialog box, click Change the Password. Windows generates a new
password that you can use, or you can type your own password. In either
case, click Next when you're satisfied with the new password.
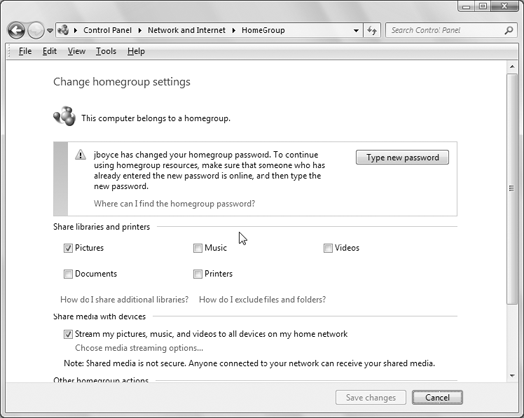
Next, go to each of the
other computers on the homegroup and open the Homegroup applet from the
Control Panel. Windows 7 detects that the password has changed and gives
you the opportunity to change it (Figure 2).
Click the Type New Password button, type the new password, and click
Next. After the password has been changed, click Finish. Repeat the
process on all of the other Windows 7 computers on your homegroup.
2. Joining a homegroup
When you add a new Windows 7
computer to your network, you can add it to your homegroup (although you
don't have to unless you want the computer to participate in the
homegroup). To add a computer to the homegroup, boot the computer and
make sure the computer is on the network.
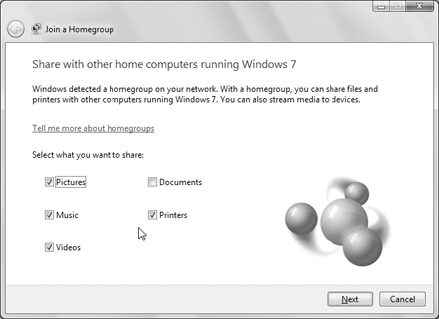
Next, open the Control Panel
and then open the Homegroup applet. Click the Join Now button, then in
the resulting Join a Homegroup dialog box (Figure 3), choose which items you want to share. Then, click Next. Type the homegroup password, click Next, and click Finish.
3. Sharing items with the homegroup
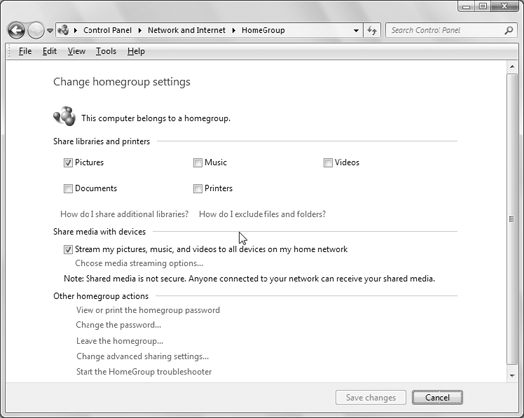
If you change your mind
about what you want to share with the homegroup, you can change sharing
options accordingly. To do so, open the Homegroup applet from the
Control Panel (Figure 4).
If you just want to choose which items to share, place a check beside
those you want to share and deselect the check box by those you don't
want shared.
You can easily share other items
with your homegroup. To do so, open the folder containing the item you
want to share. For example, if you want to share a folder in the My
Documents folder, open My Documents, click the folder, and in the
toolbar click Share With, then choose Homegroup (Read) to give others
the capability to read items in the folder, Homegroup (Read/Write) to
enable them to also write to the folder, or Nobody to remove the folder
from sharing.
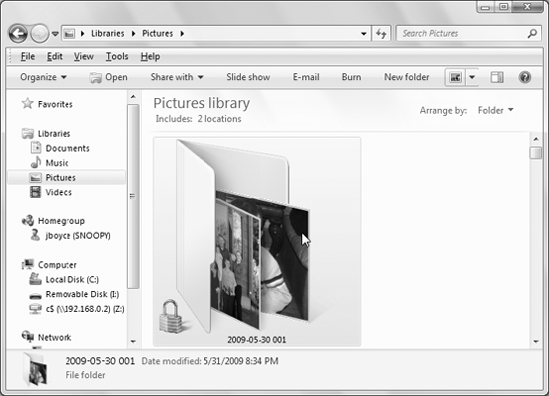
4. Excluding items from sharing
In some situations, you might
want to share a folder or library, but exclude access to certain folders
or even individual files. Excluding a folder or file is simply a matter
of setting its sharing to Nobody. Open the folder containing the folder
you want to exclude, or in the case of an individual file, open the
folder containing the file. Click the item you want to exclude, click
Share With in the toolbar, and choose Nobody. That library, folder, or
file will not show up when others browse the homegroup. On the system
where the item resides, it will have a lock icon beside it to indicate
that it is not shared (Figure 5).
5. Sharing with individual users
You can also share folders
and files with individual users, but those users must have an account on
your computer and access the files from that same computer. For
example, if you have a single home computer you share with your spouse
and children, you might want to share a folder with only your spouse and
not the children. To share the folder or file, open the folder
containing the item to be shared, click it, and click Share With in the
toolbar. Choose Specific People to open the File Sharing dialog box,
choose an account from the drop-down list, and click Add. Then, click
Share to close the dialog box.
To
access a folder or file that has been shared in this way, open the
Network folder, expand the local computer, then the Users folder, and
finally the user who is sharing the folder or file.