Keys and Names
We’ll start with the Shippers
dimension. Recall that this dimension is flat (nonhierarchical);
therefore, little refinement should be necessary. Meanwhile, this
dimension contains two attributes while one is sufficient. We should
remedy this right away. We’re not doing this just to be elegant—by
discussing how to clean this up, we will introduce some important
concepts related to dimension attributes.
Open the Shippers
dimension in the dimension designer. You’ll notice that two attributes
are defined for this dimension. One is named ShipperName, and the other is Vw Shippers,
named after the SQL Server view that served as its dimension table.
Both of these attributes allow us to drill down by shipper, but only one
is named well and only the other one is properly keyed on shipper ID;
we need to combine these two attributes into one.
Select the Vw Shippers
attribute and make sure the Properties window is visible. (If it is
not, press F4 to show it or select the View/Properties Window option
from Visual Studio’s main menu.) Look at the value settings for the
attribute’s KeyColumns and NameColumn properties; they are set to vwShippers. ShipperId and (none), respectively. Look also at the OrderBy
property, and you will see that the members of this attribute are
configured to be sorted by their IDs. This attribute is about halfway
toward being what we need; its name needs to be changed to Shipper Name, its NameColumn needs to be changed to vwShippers.ShipperName, and its OrderBy property needs to be changed from Id to Name. Bear in mind that because the Shippers dimension’s other attribute is already called Shipper Name, we’ll need to remove it before we rename Vw Shippers.
Before we delete the existing Shipper Name attribute and rename its companion, take a look at the property settings of the existing Shipper Name attribute. You’ll see that its KeyColumns property is set to ShipperName and its NameColumn property is set to (none). You’ll also see that its Usage property is set to Regular, whereas the Vw Shippers attribute’s Usage property is set to Key. The latter setting is important because every dimension must have a key attribute.
At this point, we need to delete the existing Shipper Name attribute and then rename the Vw Shipper attribute to Shipper Name to replace it. To perform the delete, simply right-click the Shipper Name
attribute and choose Delete from the shortcut menu. Click the OK button
in the message box that asks you to confirm the deletion. To rename the
Vw Shipper attribute, you can modify its Name
property in the Properties window or you can right-click the attribute
and choose the Rename shortcut menu option (or select the attribute and
press F2) and then edit the name in place.
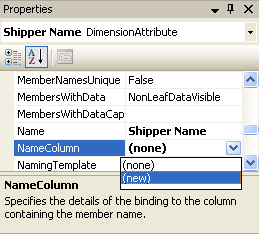
After renaming the attribute in the Properties window, select the NameColumn property, click the drop-down arrow, and select the (new) option from the drop-down list (Figure 1).
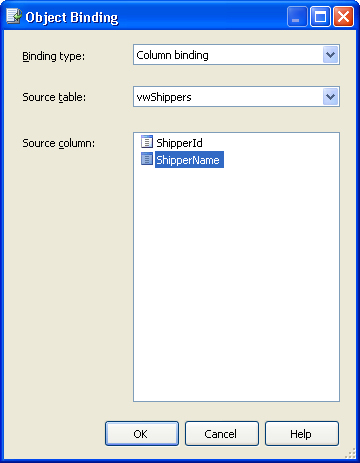
In the resulting Object Binding dialog box, select ShipperName from the Source Column list (Figure 2) and click OK.
We’re almost done adjusting our attribute. Before continuing, right-click the newly renamed Shipper Name attribute. On the shortcut menu’s Set Attribute Usage submenu (an alternative interface to the attribute’s Usage property), confirm that you see a check mark next to the Key option.
We’re done with our
attribute work, so now it’s time to deploy our changes to the server and
then use the dimension designer’s Browser tab to make sure everything
looks right. Click the Start Debugging toolbar button (ninth from the
left, with the VCR play button icon), select the Debug/Start Debugging
main menu option, or press F5 on your keyboard to save your changes and
deploy them to the server.
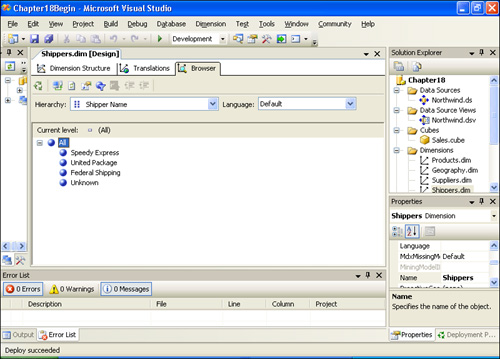
When
deployment and processing has completed, click the dimension designer’s
Browser tab. Drill down on the All (root) node of the tab’s tree view
control; your screen should appear as shown in Figure 3.
Changing the All Member
To neaten things up completely, let’s change the name of the Shippers dimension’s All member to All Shippers.
To do this, return to the Dimension Structure tab of the dimension
designer, select the root node in the Attributes tree view (that is,
select the node representing the dimension itself), and in the
Properties window change the value of the AttributeAllMemberName property to All Shippers.
Save and deploy
your changes. Then return to the Shippers dimension designer’s Browser
tab. (Visual Studio might place you there automatically.) Because the
structure of the dimension and the cube has changed, the connection
between the browser and the dimension is no longer valid. Reestablish
this connection by clicking the Reconnect button (second from the left)
on the designer’s toolbar, choosing the Dimension/Reconnect option from
the main menu, or clicking the Reconnect hyperlink in the yellow error
panel at the bottom of the designer (Figure 4).
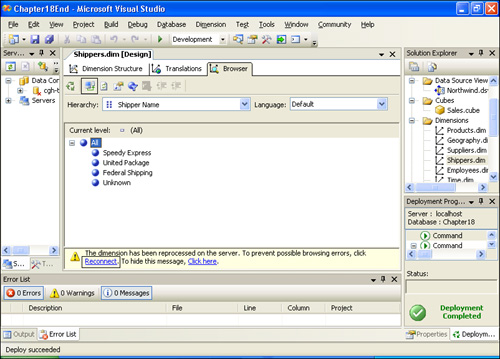
You should see Shipper Name appear as the default (and only) hierarchy in the Hierarchy drop-down list (on the Browser tab) and an All Shippers node appear in the browser’s tree view instead of the All node that preceded it. (You might need to reconnect more than once for this to display properly.) If you drill down on All Shippers, you should see the three shipper names and an Unknown member, sorted alphabetically.
Adding a Named Query to a Data Source View
Now let’s look at
improving some of the other dimensions in the cube and creating a few
new dimensions in the process. Let’s start by looking at the Employees
dimension. Open it by double-clicking its node in Solution Explorer. In
the Data Source View pane of the dimension designer, take a look at the
various fields in vwEmployees, the dimension “table” on which it’s based. As with the Shippers and Suppliers
dimensions, only two fields—a key and a name—appear in the view.
Meanwhile, several other fields are available in the original table, one
of which will be useful to add: the ReportsTo
column. This column contains the ID of the employee’s supervisor and
thus serves as a self-join foreign key. Using this column will allow us
to make a new employee-based parent-child dimension.
To start using the ReportsTo column, we could simply modify vwEmployees
back in the relational database and refresh our data source view.
Another approach would be to create a named query in the data source
view itself. A named query, in essence, is a view, but creating one does
not modify the relational database. Named queries can be a life saver
if you have read-only access to the database. In our case, we created a
view in the first place, so it would stand to reason that we could
modify it subsequently. However, let’s create a named query instead,
just to see how it’s done.
Start
by opening the Northwind data source view by double-clicking its node
in the Solution Explorer window. In the diagram pane, right-click an
empty spot and choose the New Named Query shortcut menu option to invoke
the Create Named Query dialog box. This dialog box is essentially a
container for the same SQL query designer found in SQL Server Management
Studio, along with a customized toolbar, text boxes for a name and
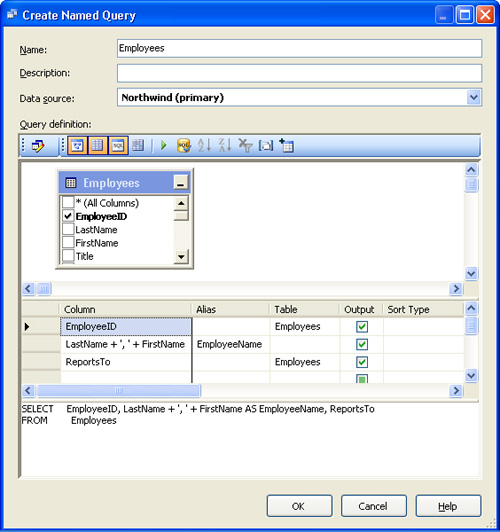
description, and a drop-down list of data sources. Name the query Employees, and insert the following query text into the SQL pane (the multi-line text box on the bottom) of the query editor:
SELECT EmployeeID, LastName + ', ' + FirstName AS EmployeeName, ReportsTo FROM Employees
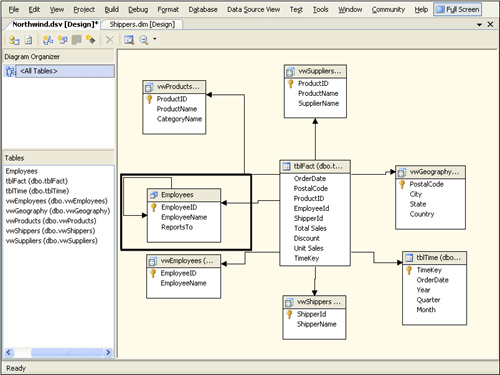
Before we can use this
named query to create a new employee-based dimension, we need to create
two relationships on it: one to codify the self-join from the ReportsTo column to the EmployeeId column and another from the EmployeeId column of tblFact to the like-named column in the named query. To do this, start by right-clicking the EmployeeId column of the Employees
named query and choosing the Set Logical Primary Key shortcut menu
option (or left-click the column and select the Data Source View/Set
Logical Primary Key option from the main menu). Next, create the
relationship between the fact table and the named query and the
self-join just discussed by using the drag-and-drop procedure , the Data Source View/New Relationship... main
menu option, or the New Relationship... main menu option on any of the
various shortcut menus in the Diagram pane or the Tables pane. You can
also use the New Relationship button
(fourth from the right) on the data source view designer’s toolbar.
When you’re done, your data source view should appear as shown in Figure 6. Save your changes before proceeding.