Adding a Data Source View
What we’ve done so far is
akin to creating a database connection; we still need to specify what
objects from the Northwind database we wish to use in order to build our
cube. To specify this information, we need to add a data source view to
our project. To do this, right-click the Data Source Views folder in
Solution Explorer and select New Data Source View... from the shortcut
menu. This brings up the Data Source View Wizard.
Click Next on the
Welcome page, and click Next again on the Select A Data Source page,
making sure that the Northwind data source you just created is selected.
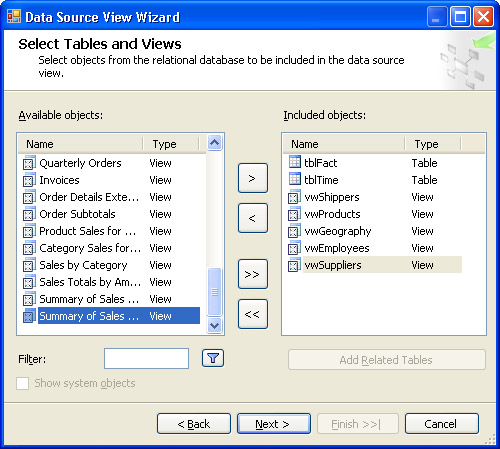
On the Select Tables And Views page, select (that is, move from the
Available Objects list to the Included Objects list) the tables tblFact
and tblTime (tables are listed first in the Included Objects list) and
the views vwShippers, vwProducts, vwGeography, vwEmployees, and
vwSuppliers (which appear toward the bottom of the Included Objects
list). Figure 3 shows how the lists should appear at this point.
When
you’re building data source views, don’t panic if you’re not sure which
tables to select. You can bring back this page later as the standalone
Add/Remove Tables dialog box in the Data Source View designer when
you’re done with the wizard.
You can type a
wildcard filter expression in the Filter text box to limit the tables
and views that appear in the Available Objects list. For example, typing
vw and
then either pressing the Enter key on your keyboard or clicking the
funnel icon button to the right of the text box filters the list to
display only tables and views that begin with the letters vw.
Once you’ve moved at
least one table into the Included Objects list, you can select a table
(or multiple tables) and click the Add Related Tables button to
instantly select all tables related to it (or them).
Tip
This
can be a great shortcut: If you include the fact table first and then
click Add Related Tables, you can often move over all the dimension
tables at once, depending on the design of your star schema database.
Because we’re using views and an unrelated table for our dimension
tables, this shortcut will not work in our particular case. |
When you’re done
selecting your tables, click Next. On the Complete the Wizard page,
accept the default name of “Northwind” assigned to your data source view
and then click Finish.
After a brief pause,
the wizard disappears and your data source view automatically opens in
its designer. The tables in the data source view might need to be
manually arranged so that they are all visible simultaneously with the
fact table in the center (Figure 4).
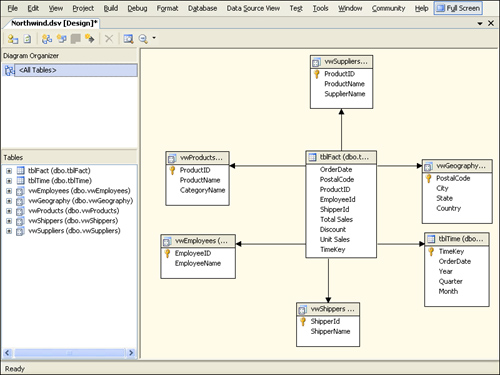
The designer is divided
into three panes: On the upper left is the Diagram Organizer pane, on
the bottom left is the Tables pane, and on the right is the diagram
pane. The All Tables diagram that is displayed in the diagram pane shows
all the tables you selected in the Wizard. It is possible to add
additional diagrams to the data source view that contain only a subset
of the tables/views in the data source view by selecting the Data Source
View/New Diagram main menu option, right-clicking within the Diagram
Organizer pane and selecting New Diagram from the shortcut menu, or
clicking the New Diagram toolbar button (third from left). After taking
any of these three actions, you can type a diagram name and then drag
tables and views from the Tables pane onto the design surface in the
diagram pane. If you accidentally drag a table or view that you don’t
want into the diagram, simply right-click it and choose Delete Table
From DSV.
The set of tables and
views that the data source view is based on, which you first specified
in the Select Tables And Views page of the Data Source View Wizard, can
be altered within the data source view designer. You may do so through
the Add/Remove Tables dialog box, which can be brought up via the Data
Source View/Add Remove Tables... main menu option, the Add Remove
Tables... diagram pane shortcut menu option, or the Add/Remove Objects
toolbar button (on the far left). Individual tables can be removed from
the data source view by selecting them in the Tables or diagram pane and
clicking the Delete toolbar button (third from right) or by
right-clicking the tables in either pane and selecting the Delete Table
From DSV shortcut menu option.
By default, all foreign
key constraint relationships between tables are shown in the diagrams as
the tables they relate to are added to a diagram. In our case, no
pre-declared constraint relationships exist, so you must add
relationships to the data source view diagram yourself. To do so, just
click in the foreign key column in tblFact and drag the mouse to connect
to the corresponding column in the corresponding dimension table.
For example, you can
click the EmployeeId field in tblFact (to highlight it) and drag the
mouse to the EmployeeId field in vwEmployees. Release the mouse button,
and you should see an arrow-headed line joining the fact table to the
view. Double-click it (or single-click it and select the Data Source
View/Edit Relationship... main menu option, or right-click it and select
the Edit Relationship... shortcut menu option) to bring up the Edit
Relationship dialog box, where you can edit the properties of this
relationship and confirm that you joined the correct columns (Figure 5).
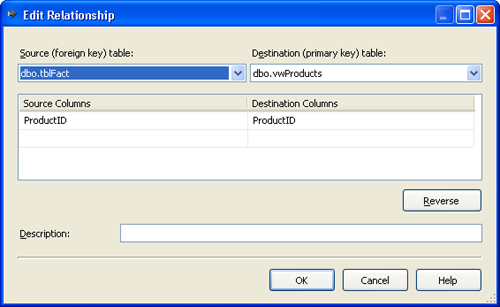
The Edit Relationship
dialog box is essentially a property sheet for the relationship between
the fact table and the employee dimension “table” (which is actually the
view called “vwEmployees”). A modified version of this dialog box, the
Create Relationship dialog box, can be used to create relationships if
the drag-and-drop method does not appeal to you. You can bring up the
Create Relationship dialog box by selecting the Data Source View/New
Relationship... main menu option, by selecting the New Relationship...
diagram pane shortcut menu option, or by clicking the New Relationship
toolbar button (fourth from right).
For our cube, we
need to build relationships between tblFact and each of the dimension
tables (views). Build the following additional relationships and then
save your changes. (See the text following the table for special
instructions on the relationships to vwGeography and tblTime.)
| Source Table | Source Column | Destination Table | Destination Column |
|---|
| tblFact | ProductId | vwProducts | ProductId |
| tblFact | PostalCode | vwGeography | PostalCode |
| tblFact | ProductId | vwSuppliers | ProductId |
| tblFact | ShipperId | vwShippers | ShipperId |
| tblFact | TimeKey | tblTime | TimeKey |
You’ll notice that
for vwGeography and tblTime, a logical primary key does not exist, and
the designer will ask if you’d like to define one. The designer asks
this question because no columns in either of these views are primary
keys in the physical tables they are derived from. For now, select Yes.
The data source view
designer allows you to add and remove tables, relationships, and
so-called named queries from diagrams. Named queries are much like
database views, but they are persisted in your data source view and not
in the star schema database. Right-clicking on a particular table,
either in the diagram pane or in the Tables list, allows you to add a
named calculation. This is essentially like adding a calculated field in
a view, but again it is persisted in the data source view rather than
in the source database. You can also browse the data within any table in
your data source view and perform PivotTable, Chart, and PivotChart
analysis on it by right-clicking it (again, in the diagram pane or the
Tables list) and selecting Explore Data from the shortcut menu.
The
data source view designer toolbar’s Find Table button (second from
right), the Data Source View/Find Table... main menu option, and the
Find Table option on the diagram pane’s shortcut menu all allow you to
locate and select a specific table by choosing it from a list in the
Find Table dialog box. (Merely selecting a table in the Tables pane
achieves the same purpose, so this feature is somewhat superfluous.) The
Zoom toolbar button/drop-down button (on the far right) allows you to
zoom in and out in the diagram. The Refresh Data Source View button
(second from the left), the Data Source View/Refresh... main menu
option, and the Refresh... option on the diagram pane’s shortcut menu
let you refresh the data source view; this is a great way to update the
schemas of all of a data source view’s tables if they’ve been modified
in the source database, without having to delete the data source view
and rebuild it.