Custom Components
Writing custom components
is one way to extend the functionality of the data flow task. In a
sense, all components are custom components, even the ones that ship
with Integration Services, which shows how flexible and powerful custom
components can be. However, writing components is often not a trivial
matter. Here are some advantages and disadvantages to consider before
deciding whether to write your own component.
The advantages include:
Fewer restrictions on the functionality you can implement.
More control over the code—for example, if you need to tune the code for performance.
More
language options for writing the component. This is important if the
component needs to use another technology that’s available only using
certain languages.
Can be reused easily in different packages once the component is installed.
The disadvantages include:
Steep learning curve.
Usually takes more time and effort than other ways of extending the data flow task.
Less
portability because the custom component must be available on the
machine running the Integration Services package that uses it.
Might
require that a custom UI editor be written if the default UI editor
available in Integration Services for custom components does not work
well enough.
Custom components
can be managed or unmanaged. Let’s start with unmanaged components.
Unmanaged components are COM objects that implement the two component
interfaces, IDTSDesigntimeComponent90 and IDTSRuntimeComponent90. The methods on IDTSDesigntimeComponent90 support design-time functionality, such as setting property values. The methods on IDTSRuntimeComponent90
support runtime functionality, such as processing the data in the data
flow. In addition to installing the component in the registry as a COM
object, you must also put other information about the component in the
registry. Under the COM entry for the component, you must put in a
section called DTSInfo that contains information about the component,
such as whether it is a source, a transform, or a destination. Also, the
component’s registry entry must have an Implemented Categories key for
registering it with the category for data flow components so it can be
enumerated by Integration Services. For an example of a registry entry
for an unmanaged component, use regedit on a machine with Integration
Services installed to look for the OLE DB source adapter under
HKEY_CLASSES_ROOT\CLSID\{2C0A8BE5-1EDC-4353-A0EF-B778599C65A0}.
Unfortunately, Integration Services does not include a base class for
writing unmanaged components.
In contrast to unmanaged components, managed components are written as classes deriving from the PipelineComponent base class, which has default implementations for the methods on IDTSDesigntimeComponent90 and IDTSRuntimeComponent90.
The same component information that unmanaged components must add to
the registry is made available to Integration Services using the DtsPipelineComponent attribute on the managed component.
How do you decide whether
to write a managed or unmanaged component? Here are some advantages to
writing a managed component rather than an unmanaged component:
Integration Services ships with a base class for writing managed components but no base class for writing unmanaged components.
In general, managed code is more forgiving than unmanaged code and takes less time to write.
A more moderate learning curve
Here are some advantages to writing an unmanaged component:
All data flow functionality is available, including some direct data buffer access techniques.
Possibly better performance during execution due to no interop cost because the data flow engine is unmanaged.
Most custom
component authors write more managed components than unmanaged. Given
that, we present a sample of a custom managed component that maps months
from a numeric representation to a string representation. For example, 1
will be mapped into “Jan”. The sample shows some of the fundamental
techniques for writing custom components. Listing 2 shows the complete sample before we start.
Listing 2. Complete custom component sample
using Microsoft.SqlServer.Dts.Pipeline;
using Microsoft.SqlServer.Dts.Pipeline.Wrapper;
using Microsoft.SqlServer.Dts.Runtime.Wrapper;

namespace SSISComponent
{
    [
        DtsPipelineComponent(DisplayName = "Map Month", ComponentType =
          ComponentType.Transform)
    ]
    public class MapMonthComponent : PipelineComponent
    {
        private int inputColumnBufferIndex = -1;
        private int outputColumnBufferIndex = -1;
        private string[] monthNames = new string[12]{"Jan", "Feb", "Mar", "Apr", "May",
          "June", "July", "Aug", "Sept", "Oct", "Nov", "Dec"};

        public override void ProvideComponentProperties()
        {
            // Set the name
            ComponentMetaData.Name = "Map Month";

            // Support one input
            ComponentMetaData.InputCollection.RemoveAll();
            IDTSInput90 input = ComponentMetaData.InputCollection.New();
            input.Name = "MapMonthInput";

            // Support one output
            ComponentMetaData.OutputCollection.RemoveAll();
            IDTSOutput90 output = ComponentMetaData.OutputCollection.New();
            output.Name = "MapMonthOutput";
            output.SynchronousInputID = input.ID;

            // Add an output column
            IDTSOutputColumn90 outputColumn = output.OutputColumnCollection.New();
            outputColumn.Name = "Month";
            outputColumn.SetDataTypeProperties(DataType.DT_WSTR, 7, 0, 0, 0);
        }

        public override DTSValidationStatus Validate()
        {
            DTSValidationStatus validationStatus = base.Validate();

            if (validationStatus != DTSValidationStatus.VS_ISVALID)
            {
                return validationStatus;
            }

            // Check the number of input
            IDTSInputCollection90 inputCollection = ComponentMetaData.InputCollection;
            if (inputCollection.Count != 1)
            {
                bool cancel = false;
                ComponentMetaData.FireError(-1, ComponentMetaData.IdentificationString,
                  "One input is supported.", "", 0, out cancel);
                  return DTSValidationStatus.VS_ISBROKEN;
            }

            // Check the number of input columns
            IDTSInputColumnCollection90 inputColumnCollection =
              ComponentMetaData.InputCollection[0].InputColumnCollection;
              if (inputColumnCollection.Count != 1)
            {
                bool cancel = false;
                ComponentMetaData.FireError(-2, ComponentMetaData.IdentificationString,
                  "One input column is supported.", "", 0, out cancel);
                  return DTSValidationStatus.VS_ISBROKEN;
            }

            // Check the data type of the input column.
            if (inputColumnCollection[0].DataType != DataType.DT_I4)
            {
                bool cancel = false;
                ComponentMetaData.FireError(-3, ComponentMetaData.IdentificationString,
                  "The input column is not of data type DT_I4", "", 0, out cancel);
                  return DTSValidationStatus.VS_ISBROKEN;
            }

            return DTSValidationStatus.VS_ISVALID;
        }

        public override void PreExecute()
        {
            // Get the buffer column index for the input column
            IDTSInput90 input = ComponentMetaData.InputCollection[0];
            IDTSInputColumn90 inputColumn = input.InputColumnCollection[0];

            inputColumnBufferIndex = BufferManager.FindColumnByLineageID
             (input.Buffer, inputColumn.LineageID);
            // Get the buffer column index for the output column
            IDTSOutputColumn90 outputColumn = ComponentMetaData.OutputCollection
             [0].OutputColumnCollection[0]; outputColumnBufferIndex =
                BufferManager.FindColumnByLineageID
                 (input.Buffer, outputColumn.LineageID);
        }

        public override void ProcessInput(int inputID, PipelineBuffer buffer)
        {
            if (!buffer.EndOfRowset)
            {
                while (buffer.NextRow())
                {
                    // Get the month in the input column
                    int month = buffer.GetInt32(inputColumnBufferIndex);

                    // Transform the month and put it in the output column
                    if (month < 1 || month > 12)
                    {
                        buffer.SetString(outputColumnBufferIndex, "Invalid");
                    }
                    else
                    {
                        buffer.SetString(outputColumnBufferIndex, monthNames[month - 1]);
                    }
                }
            }
        }
    }
}
|
To begin, we must add references to the following:
Microsoft.SqlServer.PipelineHost For the PipelineComponent and other managed component support
Microsoft.SqlServer.DTSPipelineWrap For the data flow object model
Microsoft.SqlServer.DTSRuntimeWrap To access the Integration Services data type enumeration
Here are some of properties of the DtsPipelineComponent attribute we use:
DtsPipelineComponent(DisplayName = "Map Month", ComponentType = ComponentType.Transform)
There are other properties as well. The CurrentVersion
property is worth mentioning because it is a part of the automatic
upgrade system available to components. Here’s an overview of how the
upgrade system works: If the current version of the component installed
on the machine on which an Integration Services package is executed is
later than the version of the component within the package, the old
version of the component in the package can be automatically updated to
the new version by using its PerformUpgrade method.
The base class for managed components is the PipelineComponent class. The first method we override is ProvideComponentProperties.
This method is called to allow a component to provide its properties
and other metadata by modifying its component metadata, which is
accessed by using the ComponentMetaData property.
public override void ProvideComponentProperties()
{
            // Set the name
            ComponentMetaData.Name = "Map Month";

            // Support one input
            ComponentMetaData.InputCollection.RemoveAll();
            IDTSInput90 input = ComponentMetaData.InputCollection.New();
            input.Name = "MapMonthInput";

            // Support one output
            ComponentMetaData.OutputCollection.RemoveAll();
            IDTSOutput90 output = ComponentMetaData.OutputCollection.New();
            output.Name = "MapMonthOutput";
            output.SynchronousInputID = input.ID;

            // Add an output column
            IDTSOutputColumn90 outputColumn = output.OutputColumnCollection.New();
            outputColumn.Name = "Month";
            outputColumn.SetDataTypeProperties(DataType.DT_WSTR, 7, 0, 0, 0);
}
We design our component to use one input and one column. The input contains one column of data type integer.
The value of that integer is mapped to a month, which is set into an
output column. So, in the method, our component adds one input and one
output. To its output, it adds an output column called Month, and it
sets its data type to a Unicode string type with a length of 7, which is
sufficient for all the month-related data the component adds to the
flow, including a string for handling invalid data. No input column is
added in this method because you create input columns by mapping them to
upstream output columns from where the data originates, and no upstream
output columns are available in this method because the component’s
input was just created and therefore not yet attached to any other
component. If you worked through the earlier section on constructing a
data flow programmatically, you should see that the correct method for
creating our component’s input column is its SetUsageType method.
Best Practices
It’s
good practice to set the length of your output columns to be as small
as possible so that less memory is needed, making each data row smaller.
In turn, this allows more rows to fit into each data buffer, which
should generally increase the performance of the data flow execution. |
Note the setting of the SynchronousInputID
property on the output. This property synchronizes the input and output
of the component so the same data row flowing into the input will flow
out of the output. If the input and output are not in sync, the
component becomes asynchronous, like the Aggregate component, which
means that it must generate its own output rows independently of the
incoming input rows.
More Info
Instead of setting up the input and output manually, you can have the component call base.ProvideComponentProperties();
so the base class sets up the input and output. However, keep in mind
that calling the base class for this method is not always correct
because the base class always tries to set up the component as a
synchronous transform, which is correct for our sample component but
might not be for other components. For example, if your component
doesn’t have any inputs, as in a source adapter, you should not call the
base class. |
In addition to ProvideComponentProperties,
custom components can implement other methods to control how they can
be configured during design-time. For example, our sample component only
needs one output column of data type DT_WSTR
and a length of 7. To control whether the column’s data type or length
can be modified, the component can implement the design-time method SetOutputColumnDataTypeProperties to either accept or reject a change to the column’s data type property.
Now we get to the Validation method:
public override DTSValidationStatus Validate()
{
     DTSValidationStatus validationStatus = base.Validate();

     if (validationStatus != DTSValidationStatus.VS_ISVALID)
     {
         return validationStatus;
     }

     // Check the number of input
     IDTSInputCollection90 inputCollection = ComponentMetaData.InputCollection;
     if (inputCollection.Count != 1)
     {
          bool cancel = false;
          ComponentMetaData.FireError(-1,
ComponentMetaData.IdentificationString, "One input is supported.", "", 0, out cancel);
           return DTSValidationStatus.VS_ISBROKEN;
     }

     // Check the number of input columns
     IDTSInputColumnCollection90 inputColumnCollection =
ComponentMetaData.InputCollection[0].InputColumnCollection;
     if (inputColumnCollection.Count != 1)
     {
         bool cancel = false;
         ComponentMetaData.FireError(-2,
ComponentMetaData.IdentificationString, "One input column is supported.", "", 0, out cancel);
         return DTSValidationStatus.VS_ISBROKEN;
     }

     // Check the data type of the input column.
     if (inputColumnCollection[0].DataType != DataType.DT_I4)
     {
         bool cancel = false;
         ComponentMetaData.FireError(-3,
ComponentMetaData.IdentificationString, "The input column is not of data type DT_I4", "", 0, out cancel);
                return DTSValidationStatus.VS_ISBROKEN;
     }

     return DTSValidationStatus.VS_ISVALID;
}
Validation
is called during package construction by the Integration Services
designer and before execution by the data flow engine. This method
ensures that the component is in a valid state and that the data flow
engine does not start execution unless all components pass validation.
For example, our sample component requires one input column, so its
validation method should check for it. Validation should indicate that
something is wrong by posting an error and returning the appropriate
validation status. This status is an enumeration with the following
possible values, listed here from the least to the most severe:
VS_ISVALID Indicates that everything is okay with the component.
VS_NEEDSNEWMETADATA Indicates that something is wrong but the component can fix the problem if its ReinitializeMetaData method is called. If you return this status, make sure the code in ReinitializeMetaData can fix the problem.
VS_ISBROKEN
Indicates that something is wrong but the problem can be fixed manually
by the user with the component’s custom UI editor or the advanced UI
editor.
VS_ISCORRUPT
Indicates that something is wrong and the only way to correct the
problem is to reset the component. One way to do this is to call the
component’s ProvideComponentProperties method.
Best Practices
It
is good practice to validate for the most severe problems first, if
possible. For example, most users will be upset if they go out of their
way to fix VS_ISBROKEN-related problems, only to be presented with a VS_ISCORRUPT problem that requires them to reset the component, thereby wiping out all the changes they made to fix the VS_ISBROKEN-related
problems. Another good practice is to return the most severe status if
multiple problems are found with different validation statuses. |
The use of the ComponentMetaData.FireError method in Validation
demonstrates how custom error messages are posted. That method takes a
custom error code, which should be unique among all the error codes used
by the component. The error text passed into the method should be the
final version of the text, without any unfilled parameters, and already
localized if needed. The cancel
parameter is passed into the method but is not used. Its value can be
set by the event sink that handles the error to tell the component to
cancel processing.
Best Practices
Every object in the data flow object model has an identification string with the following format: object type “object name” (object ID).
The object ID contained in the string is unique for each object within
the same data flow, so using the identification string is less ambiguous
than using just the object name in error messages. |
The call to base.Validate validates the component generically, which includes a call to ComponentMetaData.Validate to have the data flow task validate the component in the context of the layout.
It is often impractical to have Validate
be exhaustive—for example, when a certain portion of the validation
requires a resource that is expensive to acquire. In those cases, the
problem might surface during execution, in which case the component
should attempt to fail gracefully. The validation of our sample
component is not exhaustive, but other required validation steps, such
as checking the output metadata, follow the same guidelines discussed so
far for validation.
If a component in a data flow returns VS_ISVALID, it is in a valid state and can be executed. The component’s runtime methods that support execution are PrepareForExecute, PreExecute, PrimeOutput, ProcessInput, PostExecute, and Cleanup. Our sample component implements PreExecute and ProcessInput:
public override void PreExecute()
{
    // Get the buffer column index for the input column
    IDTSInput90 input = ComponentMetaData.InputCollection[0];
    IDTSInputColumn90 inputColumn = input.InputColumnCollection[0];
    inputColumnBufferIndex = BufferManager.FindColumnByLineageID(input.Buffer,
inputColumn.LineageID);

    // Get the buffer column index for the output column
    IDTSOutputColumn90 outputColumn = ComponentMetaData.OutputCollection[0].OutputColumnCollection[0];
    outputColumnBufferIndex = BufferManager.FindColumnByLineageID(input.Buffer,
outputColumn.LineageID);
}

public override void ProcessInput(int inputID, PipelineBuffer buffer)
{
    if (!buffer.EndOfRowset)
{
// Do any additional processing if needed,
     // Get the month in the input column
     while (buffer.NextRow())
         {
             // Get the month in the input column
             int month = buffer.GetInt32(inputColumnBufferIndex);

             // Transform the month and put it in the output column
             if (month < 1 || month > 12)
             {
                buffer.SetString(outputColumnBufferIndex, "Invalid");
             }
             else
             {
                buffer.SetString(outputColumnBufferIndex, monthNames[month - 1]);
             }
         }
     }
}
Our sample component’s PreExecute method makes use of the BufferManager,
whose methods are used to return information about the data buffers set
up by the data flow engine. For the component to know which columns in
the data buffer are mapped to its input and output columns, it uses the FindColumnByLineageID method of BufferManager. Given a column’s lineageID, that method returns the index of the column in the data buffer.
More Info
Notice that input.Buffer is used instead of output.Buffer to get the buffer column index for the component’s output column. Why isn’t output.Buffer used? The use of output.Buffer
currently returns an error for synchronous components. The reason is
that our sample’s component output is synchronous with its input, so the
same rows flowing into its input flow out of its output. For the rows
to be the same flowing in and out, they must internally contain all the
columns for the input and the output. So, input.Buffer and output.Buffer in this case point to the same internal buffer for those rows, and input.Buffer was chosen to be the handle for that internal buffer. Perhaps in a later version of Integration Services, output.Buffer will also return the correct buffer handle instead of an error. |
In ProcessInput, our sample component processes its input by applying its transformation to the data. Each call to ProcessInput
gives the component a new buffer full of rows to process. If a
component supports more than one input, it can check the input ID passed
into the method to determine which input the buffer is used for. The
standard processing done in the method starts with checking whether the
buffer has the end-of-rowset flag set. This flag is used to signal to
the component to do any processing needed after receiving the last
buffer of data. For example, an asynchronous transform such as the Sort
can start adding the sorted rows to its output buffer. If the end of
rowset has not been reached, the component accesses the correct columns
in the buffer by using the column indexes it obtained in PreExecute.
So, does our sample component need to set the end-of-rowset flag when
it is done? The answer is no. The reason is that our sample component is
synchronous and therefore does not generate new rows or remove existing
rows from the buffer. This means our component does not have to deal
with controlling the size of the rowset by setting the end-of-rowset
flag. So who sets the flag? The flag is set by the component that adds
the rows, such as a source component or an asynchronous transform, to
indicate that it has no more rows to add.
Tip
The ProcessInput
method is where synchronous components spend most of their time during
execution. This method should be the first to be optimized if good
performance is critical for your custom component. |
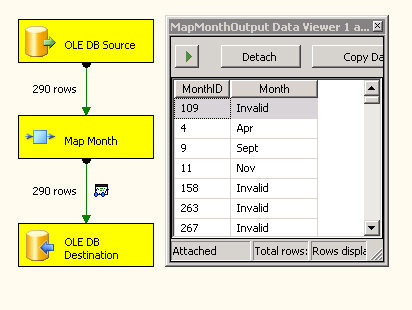
Once the sample
component is built, it should be installed into the Integration Services
data flow component directory under 90\DTS\PipelineComponents in the
SQL Server directory. If the component is unmanaged, it should be
registered in the registry. If it’s managed, it should be added to the
GAC. You can then add the component to the toolbox of the Integration
Services designer and use it in a package. Figure 2 shows our custom transform in the middle of execution.
Writing custom
components can also involve other factors not demonstrated by our sample
component—these include connection managers, error outputs, and
asynchronous outputs. However, the information and guidelines presented
in this section should make a good starting point for exploring those
other topics on your own.