Connecting the Source and Destination Adapters with a Path
To connect the OLE DB source and destination adapters, we need to create a new path in the data flow:
// Create a new path object
IDTSPath90 path = pipeline.PathCollection.New();
Next we need to
connect the standard output (that is, non-error output) of the source
adapter with the input of the destination adapter:
// Get the standard output of the OLE DB Source adapter
IDTSOutput90 oledbSourceOutput = oledbSourceMetadata.OutputCollection["OLE DB Source Out
put"];

// Get the input of the OLE DB Destination adapter
IDTSInput90 oledbDestinationInput =
oledbDestinationMetadata.InputCollection["OLE DB Destination Input"];

// Connect the source and destination adapters
path.AttachPathAndPropagateNotifications(oledbSourceOutput, oledbDestinationInput);
More Info
Why are notifications needed when AttachPathAndPropagateNotifications
is used? The answer is that some components must react to their input
or output being attached or detached by updating their component
metadata. For example, a component such as the Multicast that supports
multiple outputs might start with only one output after ProvideComponentProperties
is called. When the user indicates that he wants to use that output by
attaching it, the component can respond by adding a new output to bring
its number of outputs to two. If that output is attached as well, the
component can respond by adding yet another output. This mechanism is
one way for the user to interactively tell the component how many
outputs the user wants the component to support. Components respond to AttachPathAndPropagateNotifications using methods on the design-time interface called OnInputPathAttached and OnOutputPathAttached. |
Caution
As
mentioned earlier regarding the runtime connection collection, instead
of accessing the input and output collections using an integer index, we
use the names of the input and output, which were set when the input
and output were added by the adapters during ProvideComponentProperties.
This is less susceptible to error for components with more than one
input or output. For the OLE DB source adapter, which has a standard
output for the data and an error output, we want to make sure that we
don’t attach a path from the error output instead of the standard
output; if we use an index of 0 to get the standard output, we might get
the error output instead. |
Once the path has been
set up and the two adapters attached, we can use the output columns of
the source adapter to create the input columns of the destination
adapter. In our sample, we do this as follows:
// Get the output column collection for the OLE DB Source adapter
IDTSOutputColumnCollection90 oledbSourceOutputColumns =
oledbSourceOutput.OutputColumnCollection;

// Get the external metadata column collection for the OLE DB Destination adapter
IDTSExternalMetadataColumnCollection90 externalMetadataColumns =
oledbDestinationInput.ExternalMetadataColumnCollection;

// Get the virtual input for the OLE DB Destination adapter.
IDTSVirtualInput90 virtualInput = oledbDestinationInput.GetVirtualInput();
The virtual input is
used to access a component’s virtual input column collection. This
collection contains columns that are based on all the upstream columns
that can be used to create the component’s input columns. Many component
UIs in the data flow designer also use virtual columns to show the
possible columns that can be selected as input columns. In our sample,
the virtual input column collection created with the OLE DB destination
adapter’s input will contain two columns, which are based on the two
columns originating from the OLE DB source adapter.
// Loop through our output columns
foreach (IDTSOutputColumn90 outputColumn in oledbSourceOutputColumns)
{
     // Add a new input column
    IDTSInputColumn90 inputColumn =
oledbDestinationComponent.SetUsageType(oledbDestinationInput.ID,
virtualInput, outputColumn.LineageID, DTSUsageType.UT_READONLY);

     // Get the external metadata column from the OLE DB Destination
     // using the output column's name
    IDTSExternalMetadataColumn90 externalMetadataColumn = externalMetadataColumns[outputColumn.Name];

     // Map the new input column to its corresponding external metadata column.
    oledbDestinationComponent.MapInputColumn(oledbDestinationInput.ID, inputColumn.ID, externalMetadataColumn.ID);
}
Now we need to loop through the output columns from the OLE DB source adapter. For each output column, we first use its LineageID
to set the usage type of a virtual input column to read-only, which
effectively adds an input column to the OLE DB destination adapter and
maps it to that output column. To understand how this works, we first
need to understand what an input column’s usage type is. Usage type is a
property on input columns that indicates how the columns are used in
the data buffer. By using UT_READONLY,
we indicate to the data flow engine that the data for those input
columns will be read but not modified by the component. If you use UT_READWRITE instead of UT_READONLY,
our sample will still work. However, it is good practice to set the
usage type correctly so the data flow engine can make the best
optimization when planning its buffer usage for execution. Using the
output column’s lineage ID, the SetUsageType
method can find the virtual input column associated with that output
column. Then the method will create an input column for the component,
set its usage type, and map it to the output column by setting its
lineage ID property.
More Info
Once an input column has been created using SetUsageType, how can the column be removed? To remove the column, call SetUsageType with a usage type of UT_IGNORED. |
More Info
For output columns, the LineageID is the same as its object ID because output columns are the source of their own data. |
After calling SetUsageType
to create the input columns, we now need to associate the input column
columns with the external metadata columns that the OLE DB destination
adapter created when its ReinitializeMetaData method was called. We do this by calling the MapInputColumn method, which sets the input column’s ExternalMetadataColumnID
property to the object ID of its associated external metadata column.
That property is generally how both input and output columns are
associated with external metadata columns.
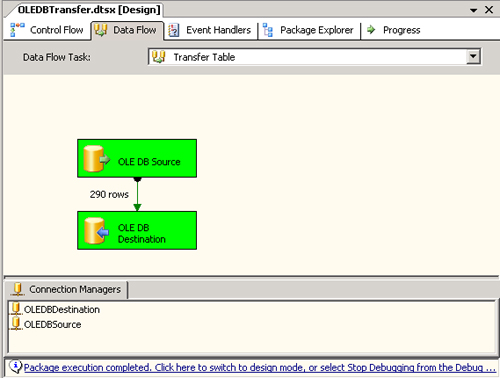
With that last step,
our data flow construction is complete. You can save the package
programmatically and then open it in the Integration Services designer
to view what we created:
// Save the package
Application application = new Application();
application.SaveToXml(@"c:\OLEDBTransfer.dtsx", package, null);
Although our
sample uses only two components, we can construct other, more complex
data flows containing more components by following this pattern. Figure 2 shows our package executed in the designer.