4. Slave Promotion
The procedures described so far work well when you have a master running
that you can use to synchronize the standby and the slave before the
switchover, but what happens if the master dies all of a sudden? Since
replication has stopped in its tracks with all slaves (including the
standby), it will not be possible to run replication just a little more
to get all the necessary changes that would put the new master in
sync.
If the standby is ahead of all the slaves that need to be
reassigned, there is no problem, because you can run replication on each
slave to the place where the standby stopped. You will lose any changes
that were made on the master but not yet sent to the standby. We will
cover how to handle the recovery of the master in this case
separately.
If the standby is behind one of the slaves, you shouldn’t use the
standby as the new master, since the slave knows more than the standby.
As a matter of fact, it would be better if the “more knowledgeable”
slave—that is, the slave that has replicated most events from the common
master—were the master instead!
This is exactly the approach taken to handle master failures using
slave promotion: instead of trying to keep a dedicated standby around,
ensure that any one of the slaves connected to the master can be
promoted to master and take over at the point where the master was lost.
By selecting the “most knowledgeable” slave as the new master, you
guarantee that none of the other slaves will be more knowledgeable than
the new master, so they can connect to the new master and read events
from it.
There is, however, a critical issue that needs to be
resolved—synchronizing all slaves with the new master so that no events are lost or
repeated. The problem in this situation is that all of the slaves need
to read events from the new master, but the positions of the new master
are not the same as the positions for the old master. So what is a poor
DBA to do?
4.1. The traditional method for promoting a slave
Before delving into the final solution, let us first take a look at the
recommended practice for handling slave promotion. This will work as a
good introduction to the problem, and also allow us to pinpoint the
tricky issues that we need to handle for the final solution.
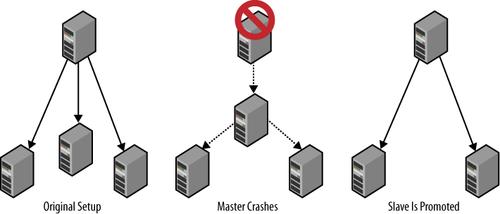
Figure 8
shows a typical setup with a master and several slaves.
For the traditional method of slave promotion, the following are
required:
Each promotable slave must have a user account for the
replication user.
Each promotable slave should run with --log-bin, that
is, with the binary log enabled.
Each promotable slave should run
without the --log-slave-updates option (the reason
will become obvious shortly).
Assume you are starting with the original setup shown in Figure 8 and that the
master fails. You can promote a slave to be the new master by doing
the following:
Stop the slave using STOP
SLAVE.
Reset the slave that is going to be the new master
using RESET MASTER.
This will ensure the slave starts as the new master and that any
connecting slave will start reading events from the time the slave
was promoted.
Connect the other slaves to the new master using CHANGE MASTER
TO. Since you reset the new master, you can start
replication from the beginning of the binary log, so it is not
necessary to provide any position to CHANGE MASTER TO.
Unfortunately, this approach is based on an assumption that is
not generally true—that the slaves have received all changes that the
master has made. In a typical setup, the slaves will lag behind the
master to various degrees. It might be just a few transactions, but
nevertheless, they lag behind. In the next section you will see a
solution to that problem.
Regardless of that, this approach is so simple that it is useful
if you can handle lost transactions or if you are operating under a
low load.
4.2. A revised method for promoting a slave
The traditional approach to promoting a slave is inadequate in most cases because
slaves usually lag behind the master. Figure 9 illustrates the
typical situation when the master disappears unexpectedly. The box
labeled “binary log” in the center is the master’s binary log and each
arrow represents how much of the binary log the slave has
executed.
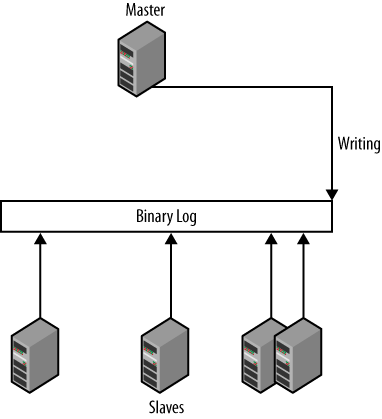
In the figure, each slave has stopped at a different binlog
position. To resolve the issue and bring the system back online, one
slave has to be selected as the new master—preferably the one that has
the latest binlog position—and the other slaves have to be
synchronized with the new master.
The critical problem lies in translating the positions for each
slave—which are the positions in the now-defunct master—to positions
on the promoted slave. Unfortunately, the history of events executed
and the binlog positions they correspond to on the slaves are lost in
the replication process—each time the slave executes an event that has
arrived from the master, it writes a new event to
its binary log, with a new binlog position. The slave’s position bears
no relation to the master’s binlog position of the same event. The
only option that remains for us is to scan the binary log of the
promoted slave. To use this technique:
Enable the binary log; otherwise, no changes can be
replicated.
Enable log slave updates (using the log-slave-updates option); otherwise, no
changes from the original master can be forwarded.
Each slave needs to have a replication user to act as a
master so that if it turns out to be the best candidate for a new
master, other slaves can to connect to it and replicate from
it.
Carry out the following steps for each of the slaves that are
not promoted:
Figure out the last transaction it executed.
Find the transaction in the binary log of the promoted
slave.
Take the binlog position for the transaction from the
promoted slave.
Start the nonpromoted slaves to replicate from that position
on the promoted slave.
To match the latest transaction on each of the slaves with the
corresponding event in the binary log of the promoted slave, you need
to tag each transaction. The content and structure of the tags don’t
matter; they just need to be uniquely identifiable no matter who
executed the transaction so each transaction on the master can be
found in the promoted slave’s binary log. We call this kind of tag
the global transaction ID.
The easiest way to accomplish this is to insert a statement at
the end of each transaction that updates a special table and use that
to keep track of where each slave is. Just before committing each
transaction, a statement updates the table with a number that is
unique for the transaction.
Tagging can be handled in two main ways:
To implement the global transaction ID, we have created the two
tables in Example 6:
one table named Global_Trans_ID to generate
sequence numbers and a separate
table named Last_Exec_Trans to record the global
transaction ID.
The server ID is added to the definition of
Last_Exec_Trans to distinguish transactions
committed on different servers. If, for example, the promoted slave
fails before all the slaves have managed to connect, it is very
important to distinguish between the transaction ID of the original
master and the transaction ID of the promoted slave. Otherwise, the
slaves that didn’t manage to connect to the promoted slave might start
to execute from a position that is wrong when being redirected to the
second promoted slave. This example uses MyISAM to define the counter table, but it is possible
to use InnoDB for this as well.
Example 6. Tables used for generating and tracking global transaction
IDs
CREATE TABLE Global_Trans_ID (
    number INT UNSIGNED AUTO_INCREMENT PRIMARY KEY
) ENGINE = MyISAM;

CREATE TABLE Last_Exec_Trans (
    server_id INT UNSIGNED,
    trans_id INT UNSIGNED
) ENGINE = InnoDB;

-- Insert a single row with NULLs to be updated.
INSERT INTO Last_Exec_Trans() VALUES ();
|
The next step is to construct a procedure for adding a global
transaction ID to the binary log so that a program promoting a slave
can read the ID from the log. The following procedure is suitable for
our purposes:
Insert an item into the transaction counter table, making
sure to turn off the binary log before doing this, since the
insert should not be replicated to the slaves:
master> SET SQL_LOG_BIN = 0;
Query OK, 0 rows affected (0.00 sec)

master> INSERT INTO Global_Trans_ID() VALUES ();
Query OK, 1 row affected (0.00 sec)
Fetch the global transaction ID using the function LAST_INSERT_ID.
To simplify the logic, the server ID is fetched from the server
variable server_id at the same
time:
master> SELECT @@server_id as server_id, LAST_INSERT_ID() as trans_id;
+-----------+----------+
| server_id | trans_id |
+-----------+----------+
|         0 |      235 |
+-----------+----------+
1 row in set (0.00 sec)
Before inserting the global transaction ID into the
Last_Exec_Trans tracking table, you can
remove its row from the transaction counter table to save space.
This optional step works only for a MyISAM table. If you use
InnoDB, you have to be careful about leaving the last used global
transaction ID in the table. InnoDB determines the next number
from the maximum value in the autoincrement column currently in
the table.
master> DELETE FROM Global_Trans_ID WHERE number < 235;
Query OK, 1 row affected (0.00 sec)
Turn on the binary log:
master> SET SQL_LOG_BIN = 1;
Query OK, 0 rows affected (0.00 sec)
Update the Last_Exec_Trans tracking
table with the server ID and the transaction ID you got in step 2.
This is the last step before committing the transaction through
a COMMIT:
master> UPDATE Last_Exec_Trans SET server_id = 0, trans_id = 235;
Query OK, 1 row affected (0.00 sec)

master> COMMIT;
Query OK, 0 rows affected (0.00 sec)
Each global transaction ID represents a point where replication
can be resumed. Therefore, you must carry out this procedure for every
transaction. If it is not used for some transaction, the transaction
will not be tagged properly and it will not be possible to start from
that position.
Now, to promote a slave after the master is lost, find the slave
that has the latest changes of all the slaves—that is, has the largest
binlog position—and promote it to master. Then have each of the other
slaves connect to it.
For a slave to connect to the promoted slave and start
replication at the right position, it is necessary to find out what
position on the promoted slave has the last executed transaction of
the slave. Scan the binary log of the promoted slave to find the right
transaction ID.
Use the following steps to carry out the recovery:
Stop the slave. Get the last-seen global transaction ID from
its Last_Exec_Trans table.
Pick the slave with the highest global transaction ID to
promote to master. If there are several, pick one.
Get the master position of the slave to promote and the
binary logs of the slave at the same time using SHOW MASTER
LOGS. Note that the last row of SHOW MASTER LOGS matches what you would
see in SHOW MASTER
STATUS.
Bring the promoted slave online and let it start accepting
updates.
Connect to the promoted slave and scan the binary log to
find the latest global transaction ID that you found in each
slave’s binary log. Unless you have a file position that you know
is good, the only good starting position for reading a binary log
is the beginning. Therefore, you have to scan the binary logs in
reverse order, starting with the latest.
This step will give you a binlog position on the promoted
slave for each global transaction ID that you collected in step
1.
Reconnect each slave to the promoted slave, starting at the
position where the slave needs to start in order to recover all
information, using the information from step 5.
The first four steps are straightforward, but step 5 is tricky.
To illustrate the situation, let’s start with an example of some basic
information gathered from the first three steps. Table 2 lists three
sample slaves with the global transaction ID of each slave.
Table 2. Global transaction ID for all connected slaves
| | Server
ID | Trans
ID |
|---|
| slave-1 | 1 | 245 |
| slave-2 | 1 | 248 |
| slave-3 | 1 | 256 |
As you can see in Table 2, slave-3 has the
latest global transaction ID and is therefore the slave you will
promote. It is therefore necessary to translate the global transaction
ID of each slave to binlog positions on slave-3. For that, we need
information about the binary log on slave-3, which we’ll obtain in
Example 7.
Example 7. Master positions of slave-3, which will be promoted
slave-3> SHOW MASTER LOGS;
+--------------------+-----------+
| Log_name           | File_size |
+--------------------+-----------+
| slave-3-bin.000001 |      3115 |
| slave-3-bin.000002 |    345217 |
| slave-3-bin.000003 |     24665 |
| slave-3-bin.000004 |    788243 |
| slave-3-bin.000005 |      1778 |
+--------------------+-----------+
5 row in set (0.00 sec)
|
The important thing to know from the output of SHOW MASTER LOGS is
the names of the logs, so you can scan them for global transaction
IDs. For instance, when reading the slave-3-bin.000005 file using mysqlbinlog, part of the output will look
like that shown in Example 8. The transaction
received by slave-3 starting at position 596 (highlighted in the first
line of the output) has the global transaction ID received by slave-1,
as shown by an UPDATE of the
Last_Exec_Trans table.
Example 8. Output from the mysqlbinlog command for one
transaction
# at 596
#091018 18:35:42 server id 1  end_log_pos 664  Query   thread_id=952   ...
SET TIMESTAMP=1255883742/*!*/;
BEGIN
/*!*/;
# at 664
#091018 18:35:42 server id 1  end_log_pos 779  Query   thread_id=952   ...
SET TIMESTAMP=1255883742/*!*/;
UPDATE user SET messages = messages + 1 WHERE id = 1
/*!*/;
# at 779
#091018 18:35:42 server id 1  end_log_pos 904  Query   thread_id=952   ...
SET TIMESTAMP=1255883742/*!*/;
INSERT INTO message VALUES (1,'MySQL Python Replicant rules!')
/*!*/;
# at 904
#091018 18:35:42 server id 1  end_log_pos 1021  Query   thread_id=952   ...
SET TIMESTAMP=1255883742/*!*/;
UPDATE Last_Exec_Trans SET server_id = 1, trans_id = 245
/*!*/;
# at 1021
#091018 18:35:42 server id 1  end_log_pos 1048  Xid = 1433
COMMIT/*!*/;
|
Table 2 shows
that the trans_id 245 is the last
transaction seen by slave-1, so now you know that the start position
for slave-1 is in file slave-3-bin.000005 at byte position 1048.
So to start slave-1 at the correct position, you can now
execute CHANGE MASTER TO and
START SLAVE:
slave-1> CHANGE MASTER TO
       ->    MASTER_HOST = 'slave-3',
       ->    MASTER_LOG_FILE = 'slave-3-bin.000005',
       ->    MASTER_LOG_POS = 1048;
Query OK, 0 rows affected (0.04 sec)

slave-1> START SLAVE;
Query OK, 0 rows affected (0.17 sec)
By going backward in this manner—locating each of the
transactions that you recorded in the first step in the procedure—you
can connect the slaves one by one to the new master at exactly the
right position.
This technique works well if the update statement is added to
every transaction commit. Unfortunately, there are statements
that perform an implicit commit before and after the statement.
Typical examples include CREATE TABLE,
DROP TABLE, and ALTER TABLE. Since these statements do an
implicit commit, they cannot be tagged properly, hence it is not
possible to restart just after them. This means
that if the sequence of statements in Example 9 is executed and
there is a crash, you will potentially have problems.
If a slave has just executed the CREATE
TABLE and then loses the master, the last seen global
transaction ID is for the INSERT
INTO—that is, just before the CREATE TABLE statement. Therefore, the slave
will try to reconnect to the promoted slave with the transaction ID of
the INSERT INTO
statement. Since it will find the position in the binary log of the
promoted slave, it will start by replicating the CREATE TABLE statement again, causing the
slave to stop with an error.
You can avoid these problems through careful use and design of
statements; for example, if CREATE
TABLE is replaced with CREATE TABLE IF NOT
EXISTS, the slave will notice that the table already exists
and skip execution of the statement.
Example 9. Statements where global transaction ID cannot be
assigned
INSERT INTO message_board VALUES ('[email protected]', 'Hello World!');
CREATE TABLE admin_table (a INT UNSIGNED);
INSERT INTO message_board VALUES ('', '');