The Maintenance Plan Wizard is a tool that
is available in SSMS. It provides an automated means for creating the
basic tasks needed to maintain a database. It does not include all the
tasks available for use in a maintenance plan but is a great starting
point that allows you to quickly generate the basic elements of a good
plan.
You launch the Maintenance Plan Wizard by expanding the Management
node in SSMS and then right-clicking Maintenance Plans and selecting
Maintenance Plan Wizard. The Maintenance Plan Wizard is like most other
Microsoft wizards in that it presents sequential dialog boxes that allow
you to incrementally provide the information needed to create the
wizard’s objective.
The Maintenance Plan Wizard first displays an
introductory dialog box. When you click Next, it displays a dialog box
(like the one shown in Figure 1)
that allows you to specify the name and a description for your
maintenance plan. You should choose a naming convention that will allow
you to easily identify a maintenance plan and the type of maintenance it
is performing. The name is displayed in the Object Explorer tree, and a
good naming convention will make it easier to locate the plan you want.

The Select Plan Properties screen also allows you to
specify the schedule for the maintenance plan. This schedule will be
tied to the corresponding scheduled job that is created when the
Maintenance Plan Wizard completes. You will find that the scheduling
dialog that appears when you click on the Change button is very flexible
and consistent with other places in SQL Server where a schedule can be
defined.
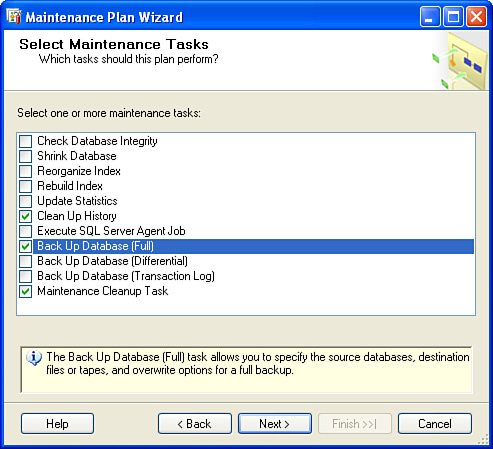
After you name the maintenance plan and specify the
schedule, you can click Next. The dialog box that appears next allows
you to select the maintenance tasks you would like to perform on the
server. Figure 2
shows the Select Maintenance Tasks dialog, with the tasks that are
available from the wizard. You can select more than one task for a given
plan. As mentioned earlier, the tasks listed in the wizard are not all
the tasks available in a maintenance plan.
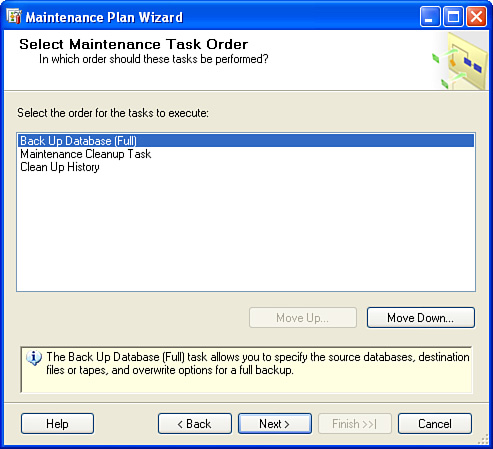
The dialog box that appears next, as shown in Figure 3,
allows you to specify the order in which the tasks are executed.
Obviously, the order of the tasks can be a critical factor and is
dependent on the type of tasks you are running. You can click the Move
Up and Move Down buttons to change the order of the tasks.
The
dialog boxes discussed so far are consistent for all the maintenance
plans. The dialog boxes that follow are dependent on the tasks selected
for the plan. Each task has a relevant set of properties that are
displayed for entry in a subsequent dialog box. The following sections
cover some of the common maintenance tasks and the wizard screens that
relate to them.
Backing Up Databases
Backing up databases is the most basic element of a
maintenance plan—and probably the most important part.For example, in the event of a disk
drive failure, database backups can be used to restore the database data
that was located on that drive.
The database backup options available via a
maintenance plan include full, differential, and transaction log
backups. The type of backup you select for a plan is heavily dependent
on the type of environment you are maintaining and the type of database
you are backing up. Databases that have very few changes may only need a
nightly full backup and do not require transaction log or differential
backups.
In most cases, it is a good idea to take a full backup of your system and user databases each night. Figure 4 shows the backup options the wizard displays for a full backup.
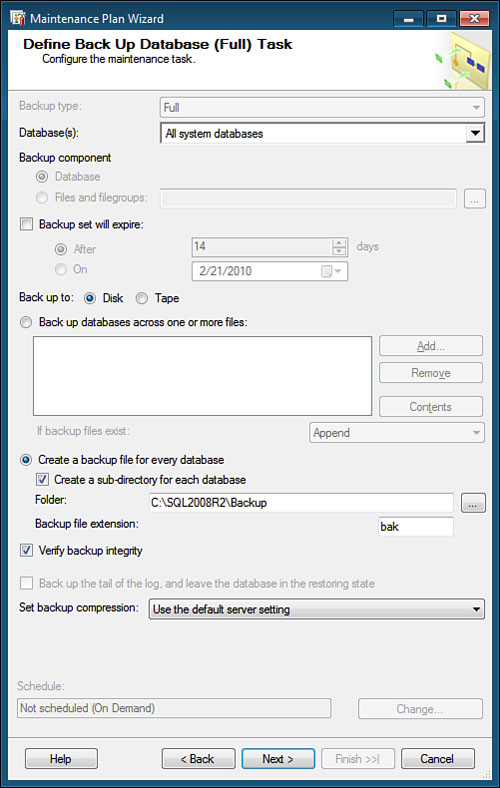
To set the properties for a full backup, you need to
first define the databases you want to back up. You select the databases
by using the Databases drop-down at the top of the screen. This
drop-down is unique in that it gives you a variety of radio button
options rather than just a simple list. You can choose to back up all
databases, all system databases, or all user databases, or you can
select specific databases.
After you select the database(s) you want to back up,
you must select a destination for the backup files. The destination
includes the type of media (that is, tape or disk) and the file or files
on that medium. The option Back Up Databases Across One or More Files
allows you to specify one or more fixed files that the database backup
will always be written to. With this option, you can choose to append
each backup to the file(s) or overwrite the contents of the file(s) each
time the backup is performed. If you choose to overwrite the backup
each time, you have only the latest backup available for restoration. If
you choose to append to the file, older backups are retained on this
file, and the file continues to grow with each subsequent backup.
The preferred option for creating full backups with
the wizard is the option Create a Backup File for Every Database. This
option creates a separate file for each database in the maintenance
plan. The backup file that is created has the database name as the first
part of the filename, followed by _backup_ and then a time stamp that indicates when the backup was created. For example, a backup named AdventureWorks2008_backup_200608231402.bak would be a backup file created using this option for the AdventureWorks2008
database. Multiple versions of backups can be retained with this
option, and the identification of the backup is simple because of the
naming convention.
Caution
You should use the option Back Up Databases Across
One or More Files with caution. The pitfall with overwriting the file
with this option is that only one backup is available for restoration.
When this option is used with the Append option, you can eat up all your
disk space if the file is not cleaned up. In addition, if multiple
databases are backed up with the plan, all these backups will be spread
across the file or files specified for the destination. A separate
backup for each database is not created with this option. This can lead
to confusion and complicate the restoration process.
Generally speaking, you should steer clear of backing
up the database to a single file or set of files. Instead, you should
choose the option Create a Backup File for Every Database. This option
has fewer pitfalls and requires little attendance.
When you use the Create a Backup File for Every
Database option, you need to specify a folder for the database backups
to be written to. You can use the default folder, or you can change it
to a folder of your choice. It is a good practice to choose a folder on a
drive that is different from the drive where your database files
reside. Having backups on the same drive as your data could be a big
problem if that drive fails and your only backups are on that drive. If
you select the option Create a Sub-directory for Each Database, each
database has a separate subfolder under the folder specified for the
backup.
Caution
The main pitfall associated with the option Create a
Backup File for Every Database is that many backup files can be created
and are not automatically deleted by default. This point has been
mentioned already, but it is a critical consideration. The good news is
that you can now add the deletion of the older backups to the
maintenance plan using the Maintenance Plan Wizard. To accomplish this,
you need to select the Maintenance Cleanup task and provide the desired
retention information that determines when the older backups are
removed.
Another useful option on the Define Back Up Database
screen is Verify Backup Integrity. If you select this option, SQL Server
checks the integrity of the backup files that were written as part of
the backup operation. Selecting this option extends the execution time
for the backup plan but is generally a good idea to ensure that you have
a viable backup for recovery. It is particularly useful when backups
have been written across multiple files. Unfortunately, the backup task
does not allow you to utilize the checksum options available with the
SQL Server 2008 BACKUP command, but the basic VERIFY option suffices in most instances.
New
to SQL Server 2008 is an option to define the compression for the
database backup file. The Set Backup Compression drop-down at the bottom
of the screen determines whether compression will be used. If the
default for the server is set to compress backup or the specific option
Compress Backup is selected, the backup file is created in a compressed
format that will reduce the size of the backup file and save disk space.
The trade-off when using compressed backups is that the creation of
these backups takes additional CPU resources during their creation.
However, the additional CPU processing time is typically offset by the
faster I/O as a result of the reduced size of the backup file.
Note
In SQL Server 2008, compressed backups can only be
performed in the Enterprise Edition. Beginning in SQL Server 2008 R2,
compressed backups can be created in the Standard and all higher
editions of SQL Server 2008 R2. Every edition of SQL Server 2008 and
later can restore compressed backups, however.
Checking Database Integrity
The Define Database Check Integrity Task screen of the Maintenance Plan Wizard, shown in Figure 5, allows you to schedule the database consistency command DBCC CHECKDB,
which checks the data pages for inconsistencies and is a good tool for
ensuring that a database is healthy. The integrity checks can be made
before each backup or on an independent schedule.
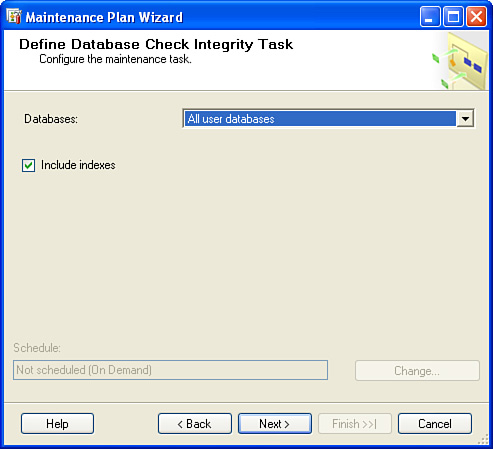
The options available for checking database integrity via the wizard are limited.
Checking the Include Indexes check box causes
integrity checks to be performed on the index pages as well. Checking
the index pages for each table extends the amount of time the task runs, but it is the most thorough way to perform an integrity check. If problems are found, you can run the DBCC CHECKDB command manually with additional options to repair the problems. In some cases, the
problems cannot be fixed without the possibility of data loss. You
should consider contacting Microsoft support if you receive consistency
errors in a critical database.
Shrinking Databases
The Define Shrink Database Task page of the Maintenance Plan Wizard, shown in Figure 6,
can be useful for keeping the size of your databases manageable. As its
name implies, this task is used to reduce the overall size of a
database. This task’s execution is essentially the equivalent to running
the DBCC SHRINKDATABASE command, and it contains task options that mirror the options available with the DBCC command.
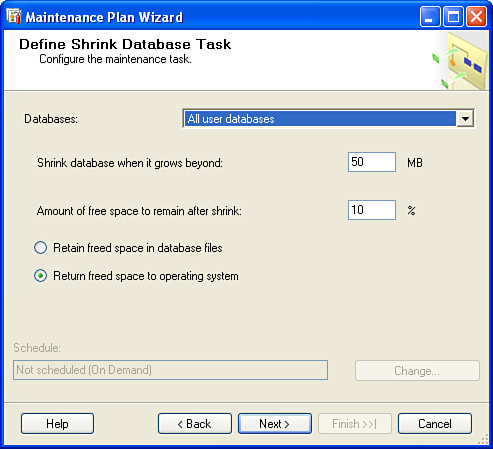
The setting Shrink Database When It Grows Beyond
specifies the overall database size that must be exceeded for the shrink
operation to occur. You set the size in megabytes, and it must be a
whole number. If the database, including data and log files, is smaller
than this size, the shrink operation does not occur.
The remaining options determine how the shrink
operation runs when the shrink threshold is exceeded. The Amount of Free
Space to Remain After Shrink option determines how much space is left
in the database files after the shrink operation is finished. This is a
target percentage and may not be feasible if the amount of disk space is
limited. SQL Server does its best to achieve the target percentage, but
it is not guaranteed. Generally, in environments where you have
abundant disk space, it is best to leave at least 10% free after the
operation so that the database can grow without the need for expanding
the size of the database files.
The
last settings on the screen determine how free space beyond the target
percentage is handled. For example, let’s assume that a large number of
rows were deleted from a database and the target free space percentage
is set to 10%. The shrink operation is run and is able to shrink the
database such that 40% is now free. You can choose to retain in the
database files the 30% beyond the target that is free by selecting the
Retain Freed Space in Database Files option. Choosing this option is the
same as running the DBCC SHRINK DATABASE command with the NOTRUNCATE
option. With this option, you do not see any changes to the size of the
database files, and the free space on the disk remains unchanged.
The other option, Return Freed Space to Operating
System, can reduce the size of the database files and return that space
to the operating system. This option utilizes the TRUNCATEONLY option that comes with the DBCC SHRINK DATABASE command and is the option needed to free up disk space on a server.
Tip
Running the Shrink Database task for every database
is not necessarily a good idea. With the Shrink Database task, the
database is condensed so that the data is located on contiguous pages in
the database data file(s). This involves the movement of pages from one
part of the file to another. This movement can cause fragmentation in
tables and indexes. The fragmentation can, in turn, cause performance
problems and undo work that may have been done with other tasks, such as
rebuilding the indexes.
The other problem with shrinking the
database relates to the cost of expanding the database at a later time.
For example, let’s say you have a database that has grown to 1GB. You
shrink the database so that it is now only 800MB, but normal use of the
database causes it to expand again. The expansion of the database files
can be expensive and cause performance problems during the actual
expansion, especially on high-volume production systems. The best
solution is to purchase the appropriate amount of disk space and size
the database so that database files do not need to expand frequently and
the shrink operation is not needed. This is easier said than done, but
it is the right answer nonetheless.