3. SQL Server CE Query Analyzer
The primary utility tool for viewing and querying
a SQL Server CE database is the SQL Server CE Query Analyzer. Like its
counterpart for SQL Server, the SQL Server CE Query Analyzer provides a
convenient way to create and submit ad hoc queries.
The installation of the SQL Server CE Query
Analyzer depends on the development environment onto which SQL Server CE
is installed. When you install SQL Server CE, the SQL Server CE Query
Analyzer is not installed by default on a device. Once the Query
Analyzer (as we’ll call the CE version for brevity in the rest of this
discussion) is installed on the device, you can run the executable file,
Isqlw20.exe, directly from the Start menu or from the directory in
which it is installed. Clicking on a database file from within the File
Explorer also opens the Query Analyzer.
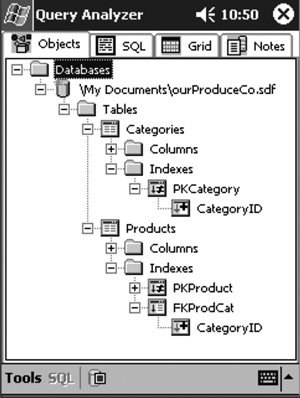
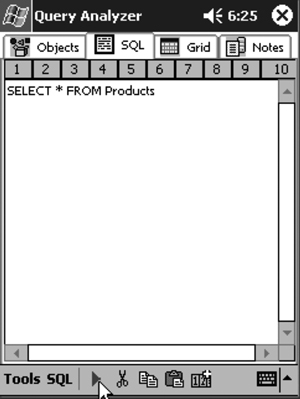
The Query Analyzer allows you to see structural information about the database (as shown in Figure 3) and submit queries to that database (as shown in Figure 4).
The Query Analyzer form displays a minimize box,
not a close box. If you use the Query Analyzer to examine your database
and then click on the minimize box, the Query Analyzer disappears but
does not close nor does it close the database it is displaying. Any
other application that tries to access the database cannot do so until
you either close the database connection in the Query Analyzer (in the
Objects tab, click on the tree node with the database name and then
click the Stop button on the toolbar) or close the Query Analyzer itself
(select Tools | Exit).
We begin with
database creation and table and index creation; then we explore
retrieving, displaying, and updating data using the two-tier approach; and finally we discuss the three-tier approach of creating and using data sets and data binding.
4. Creating a SQL Server CE Database
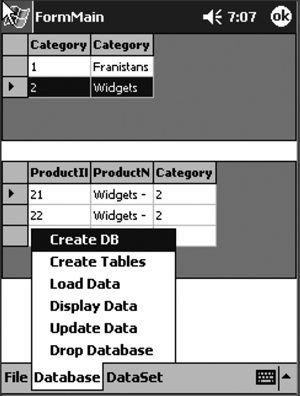
Our first sample application for accessing SQL Server CE is located in the CreateDatabase project . Shown in Figure 5, our application is used to create and populate a database.
To create a SQL Server CE database, we use the Engine class located in the System.Data.SqlServerCe namespace. Because each SQL Server CE database is a single file, all that we need to tell the Engine object is the path and name of that file. We can do this either in the Engine class constructor or by setting the object’s LocalConnectionString property. In either case, we must specify the filename prior to executing the CreateDatabase method of the Engine class because this method does not take any parameters.
Thus, the code to create a SQL Server CE database looks like Listing 1.
Listing 1. Creating a SQL Server CE Database
private string  strFile = @"My Documents\ourProduceCo.sdf";
private string  strConn = "Data Source=" +
                          @"My Documents\ourProduceCo.sdf";


private void mitemCreateDB_Click(object sender, EventArgs e)
{
   if ( File.Exists(strFile) ) { File.Delete(strFile); }

   SqlCeEngine dbEngine = new SqlCeEngine();
   dbEngine.LocalConnectionString = strConn;
   try
   {
      dbEngine.CreateDatabase();
   }
   catch( SqlCeException exSQL )
   {
      MessageBox.Show("Unable to create database at " +
                      strFile +
                      ". Reason:  " +
                      exSQL.Errors[0].Message );
   }
}
|
Although the Engine class has a CreateDatabase method, it does not have a DropDatabase method. You must drop a database by submitting a DROP DATABASE statement to the SQL Server CE database or by using the File class to delete the file.
5. Populating a SQL Server CE Database
Now that we have created our SQL Server CE
database, we can populate it with tables, indexes, and data. You might
think that we use the Engine class to do this, but we do not. The Engine class operates only on an entire database, not on the individual components within the database, such as tables. To populate our SQL Server CE
database, we use standard SQL DDL statements, such as CREATE TABLE and CREATE INDEX, and the standard SQL DML language statements INSERT, UPDATE, and DELETE.
Submitting SQL statements to a database requires two classes: one to open the connection and one to submit the statement.
5.1. The SqlCeConnection and SqlCeCommand Classes
The SqlCeConnection class opens a connection to a database and thus needs the name of the database file. The SqlCeCommand class submits one SQL statement at a time to the database using an Execute method and needs to know the connection object to use and the SQL statement to be submitted. The SqlCeConnection object and the DML statement are properties of the SqlCeCommand object. They must be set and the connection must be opened before the command’s Execute method can be called. There are three possible Execute methods, summarized in Table 3.
Table 3. The Execute Methods of the SqlCeCommand Class
| Method | Function |
|---|
| ExecuteNonQuery | Executes a SQL statement that returns no rows, such as INSERT or CREATE |
| ExecuteScalar | Executes a SQL statement that returns just one value, such as SELECT SUM(Value) FROM Orders WHERE CustomerID = "ABCD" |
| ExecuteReader | Executes a SQL statement that returns multiple columns or multiple rows |
Listing 2 shows the code for creating two simple tables.
Listing 2. Creating Two Tables
private void mitemCreateTables_Click(object sender, EventArgs e)
{
   SqlCeConnection  connDB = new SqlCeConnection();
   SqlCeCommand  cmndDB = new SqlCeCommand();

   connDB.ConnectionString = strConn;
   connDB.Open();

   cmndDB.Connection = connDB;

   cmndDB.CommandText =
      " CREATE TABLE Categories " +
      "  ( CategoryID integer not null " +
      "         CONSTRAINT PKCategories PRIMARY KEY " +
      "  , CategoryName nchar(20) not null " +
      "  )";
   cmndDB.ExecuteNonQuery();

   cmndDB.CommandText =
      " CREATE TABLE Products " +
      "  ( ProductID integer not null " +
      "         CONSTRAINT PKProducts PRIMARY KEY " +
      "  , ProductName nchar(20) not null " +
      "  , CategoryID integer not null " +
      "  , CONSTRAINT FKProdCat " +
      "       foreign key (CategoryID) " +
      "       references Categories(CategoryID) " +
      "  )";
   cmndDB.ExecuteNonQuery();

   connDB.Close();
}
|
SQL Server CE automatically creates indexes for the three constraints specified in Listing 2. You need to submit CREATE INDEX statements only for indexes that are not covered by constraints.
Listing 3 shows the code for inserting rows into the tables.
Listing 3. Adding Rows to Tables
private void mitemLoadData_Click(object sender, EventArgs e)
{
   SqlCeConnection  connDB = new SqlCeConnection();
   SqlCeCommand  cmndDB = new SqlCeCommand();

   connDB.ConnectionString = strConn;
   connDB.Open();

   cmndDB.Connection = connDB;
   cmndDB.CommandText =
      " INSERT Categories " +
      "   (CategoryID, CategoryName)" +
      "   VALUES (1, 'Franistans' )";
   cmndDB.ExecuteNonQuery();
   cmndDB.CommandText =
      " INSERT Categories " +
      "   (CategoryID, CategoryName)" +
      "   VALUES (2, 'Widgets' )";
   cmndDB.ExecuteNonQuery();

   cmndDB.CommandText =
      " INSERT Products " +
      "   (ProductID, ProductName, CategoryID)" +
      "   VALUES (11, 'Franistans - Large', 1 )";
   cmndDB.ExecuteNonQuery();
   cmndDB.CommandText =
      " INSERT Products " +
      "   (ProductID, ProductName, CategoryID)" +
      "   VALUES (12, 'Franistans - Medium', 1 )";
   cmndDB.ExecuteNonQuery();
   cmndDB.CommandText =
      " INSERT Products " +
      "   (ProductID, ProductName, CategoryID)" +
      "   VALUES (13, 'Franistans - Small', 1 )";
   cmndDB.ExecuteNonQuery();
   cmndDB.CommandText =
      " INSERT Products " +
      "   (ProductID, ProductName, CategoryID)" +
      "   VALUES (21, 'Widgets - Large', 2 )";
   cmndDB.ExecuteNonQuery();
   cmndDB.CommandText =
      " INSERT Products " +
      "   (ProductID, ProductName, CategoryID)" +
      "   VALUES (22, 'Widgets - Medium', 2 )";
   cmndDB.ExecuteNonQuery();
   cmndDB.CommandText =
      " INSERT Products " +
      "   (ProductID, ProductName, CategoryID)" +
      "   VALUES (23, 'Widgets - Small', 2 )";
   cmndDB.ExecuteNonQuery();

   connDB.Close();
}
|
Because no data is returned by the SQL statements in Listing 3, we use the ExecuteNonQuery method.
So, two classes, a few
methods and properties, some standard SQL, and we have a populated
database. Granted, it is a very simple database, but we would use the
same classes, properties, and methods to produce a more complex one.