Resolution Chart Comparison (JPEG and RAW)
Images on this page are our standard
resolution ranking which provides for measurement resolution up to 4000 LPH
(Lines per Picture Height). A value of 20 is equivalent to 2,000 lines per
picture height. For each camera we use the appropriate fixed lens (along with
what we used for all previous trials in a specific assessment). The chart is
taken at a full aperture range and the sharpest image chosen. Studio lighting,
the cameras set the aperture priority (optimum aperture selected), image
parameters default. Exposure compensation set to provide approximately 80%
luminance in the white areas.
What we would like to show here is how well
the camera is likely to process the detail in our standard test ranking
compared with the maximum resolution of the sensor according to the theory,
which for our charts captured is easy to understand - it is simply the number
of vertical pixels along (ranking shows the number of single lines per the
image height, in terms of theory, it is limited to one line per pixel).
Exceeding this limit (which when talking about line pairs is often understood
as the Nyquist frequency) the sensor cannot precisely record image detail and
aliasing occurs.
This limit is rarely achieved, because the
majority of sensors are equipped with anti-aliasing filters. Anti-aliasing
filters are made to reduce unpleasant moiré effects, but doing so, they also
reduce resolution (the relative quality and length of the filters are different
among the cameras). The X-E1 employs the unique X-Trans CMOS sensor of the
Fujifilm and therefore does not need an anti-aliasing filter, which means that
in principle it can provide a resolution close to its Nyquist limit, compared
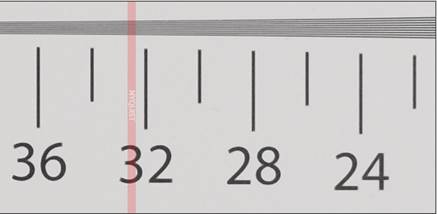
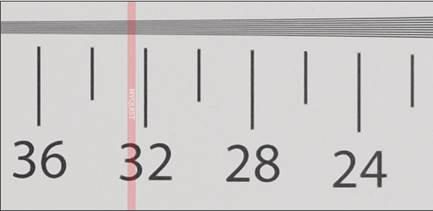
with a Bayer camera with the same number of pixels. Nyquist is pointed out in
the crops with a red line
On this page we are taking a look at both
of the JPEG and RAW resolutions. We usually convert the latter using Adobe
Camera Raw, but in the case of the X-E1, this creates plenty of processing
artifacts, therefore instead of that, we have selected to use the Raw File
Converters. We have the processing flow for this conversion:
·
Download the RAW files into Raw File Converter
·
Set sharpening configuration to 'No Sharpness'
(all sliders set to 0), all other settings default.
·
Save file as a TIFF format
·
Open file in Photoshop
·
Apply a Unsharp mask adjusted to the camera,
here 120%, Radius 0.6, Threshold 0
·
Save a JPEG file with the quality 11 for
download

JPEG
(4896 x 3264) and 3.4MB RAW (4896 x 3264) 3.2MB
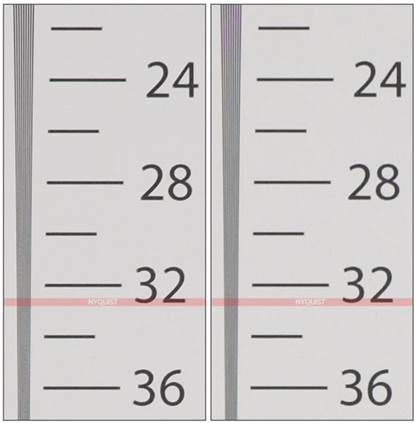
Vertical
resolution
JPEG
RAW
Horizontal
resolution
JPEG
and RAW
Like the X-Pro1, the X-E1 expresses
significantly higher resolution in this trial ranking compared with a usual
16MP Bayer-type camera such as the Nikon D7000, or even the Sony NEX-6 (which
has a remarkably weak AA filter). Indeed, in terms of resolution, the Fujiflim
is very close to the 24MP Sony NEX-7 or the Sigma SD1, which uses a 15MP Foveon
X3 sensor to record full color information at each pixel, and thus (like the
X-E1 ) does not use AA filter.
These ranked photos also show very little
wrong color, we'd expect from a Bayer camera without AA filter – there is a bit
on the RAW version, just around the point where the X-E1 begins wrestling to
correctly handle the lines on our chart, but there is nothing in the JPEG
format. This reinforces Fujifilm’s announce that the X-Trans CMOS is less
sensitive to moiré than a Bayer sensor. Last but not least, the JPEG processing
of the X-E1 can provide the same resolution as the RAW converter. We were very
impressed by the X-Pro's and X100's JPEG handling, and the X-E1 is lively with
the same standards.
As we usually see for a camera without AA
filter, the X-E1 keeps on showing the line structure on its Nyquist limit. As
usual this is wrong detail (For instance, it does not accurately represent
ranking) but using in practice, it regularly helps bring up an impression of
increasing detail anyway.
JPEG tone curves / Dynamic Range
The Dynamic Range measurement system
consists of capturing an adjusted Stouffer Step Wedge (13 stops total range),
which is backlit using a daylight balanced lamp (98 CRI). A single picture of
this creates a gray wedge scale from the camera's clipped white point down to black
(the example below). Each step of the scale is the equivalent to 1/3 EV (a
third of a stop), we choose a step at the ‘middle gray’ level (defined as 50%
brightness) and measure forwards to determine the dynamic range. Thus, there
are two aspects of the results, the amount of the shadow range (below middle
gray) and the amount of highlight area (above middle gray).

Gray
scale
For most people, highlight area is the
first thing they think about when talking about dynamic range, which is the
amount of highlight detail above middle gray area that the camera can shoot
before it crops to white. Shadow area is more sophisticated, in our test, the
line on chart stops at the luminance value decreases below the definition of
"black point" (about 2% brightness) or the signal-to-noise value
decreases below a predetermined value (where shadow detail would be obscured by
noise), regardless of which one comes first.
Note: This
page highlights our interactive dynamic range comparison utility.
The wedges below the chart are made by our
measurement system from the values read from the step wedge; the red lines
point out approximate shadow and highlight area (the dotted line showing middle
gray).
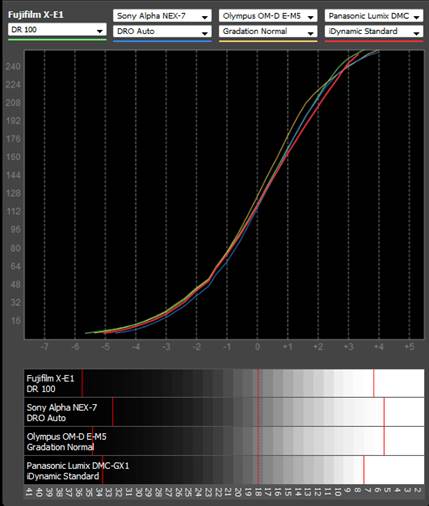
Default
tone curve
The default tone curve of the X-E1 is the
same as the X-Pro1’s, and delivers a good highlight area of about 3.7 stops,
with just enough of a roll-off into the highlights to avoid rough-looking
cropping. This puts it slightly behind when compared to the names of the Sony
NEX-7 and Olympus OM-D E-MF. However, the DR expansion mode of the Fujifilm is
particularly effective in the highlights and the DR 400 setting you get nearly
has two more stops of highlight area.
Movie modes
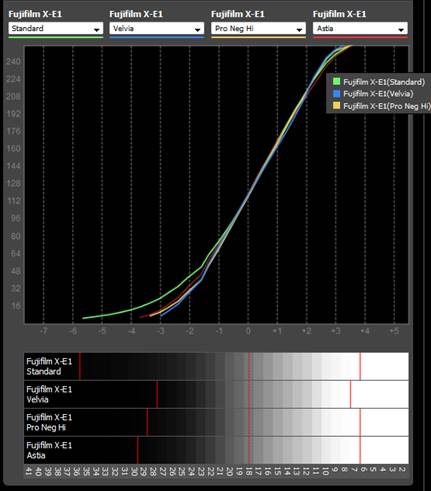
The
X-E1’s color Film Simulation modes
The Color Film Simulation modes of the X-E1
show sophisticatedly different tone curves, which transforms into tangibly real
differences. Velvia/ Vivid is really contrasty, cropping both white and black
more abruptly, while Astia / Soft echoes Provia / Standard across the highlight
area, but it is more contrasty below middle gray; the result is that the
shadows are slightly deeper. The Pro Neg Hi mode is placed somewhere between
Velvia and Astia in terms of its shadow contrast, while the Pro Neg Std nearly
fits the Provia/ Standard. Meanwhile, the diversified Monochrome modes are
entirely consistent with the Standard.
Dynamic range expansion modes
Like the X-Pro1, the X-E1 has two dynamic
range expansion settings to enhance its highlight range: DR200 (200%) gives an
additional stop of information in the highlights, and DR400 (400 %) gives two
stops. In terms of technology, the camera attains this by applying less
amplification of the sensor’s output than usual, before the AD is conversed to
avoid cropping highlight data, then midtones is pulled up to the correct
brightness determined in JPEG image processing. This is essentially the same
process that Canon and Pentax use for their highlight-expansion modes.
Another way of thinking about this is that
DR200 is like exposing under a point to keep the highlights then adjusting the
brightness; and DR400 is like under-exposing two points and adjusting much
more. Because of this, the minimum ISO is available in each limited mode: ISO
400 at DR200, and ISO 800 at DR400. The flipside to this approach is shown by
the standard ISO 100, which has the opposite effect, i.e. ISO200 exposure was
too long by a stop and then pulled-down in processing. This leads to the loss
of stop of highlight range - for all items and purposes it calculates as
DR50, and therefore it is often avoided. (Note ISO 100 is only available in
JPEG format).
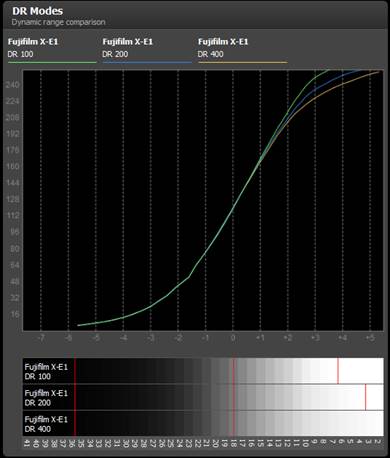
Impact
of DR setup
In this comparison we can see the impact of
the DR setting on the highlight range. DR200 provides a huge 4.7 stops of
dynamic range, and a DR400 comes towards another stop beyond this, disappearing
off the scale of our chart. It should be noted that this advantage is not only
for those who shoots JPEG images - it also extends to the RAW format. On paper
at least this is actually very impressive; we will see how it is converted into
the real results in the final review. The Fujifilm X-E1 also accompanies with
the same Shadow and Highlight Control functions like the X-Pro1. You can also
read more about the function on our review of the dynamic range of the X-Pro1.